Admin can add computers, organize them into groups, assign them to particular users and move computers between groups from the 'Computers' tab.
To add computers,
- Log in to Remote Desktop via web browser.
- Click 'Add Computer' and perform any of the following:
- To add your computer, click 'Download Installer' in the 'Add this computer' tab.
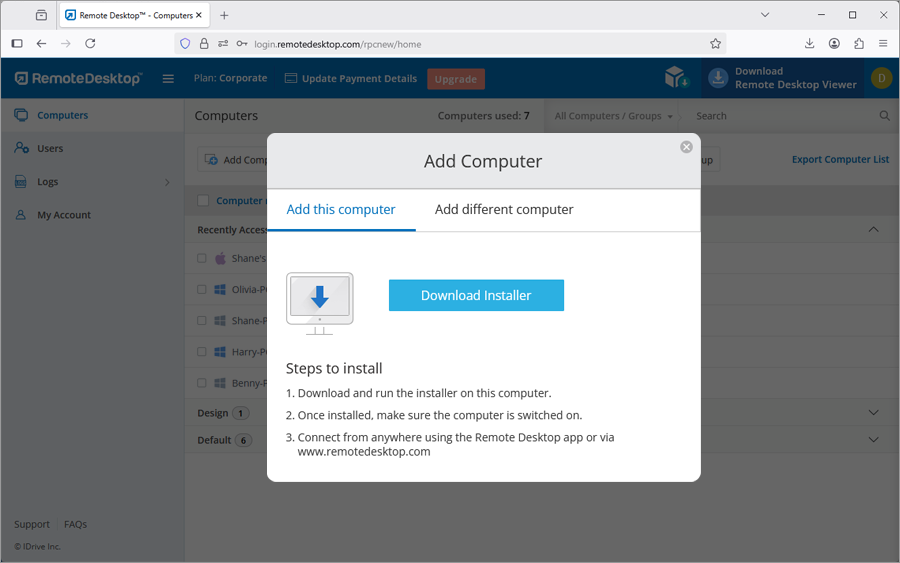
- To add different computers, go to the 'Add different computer' tab and share the given link with users to install Remote Desktop on other computers.

- To add your computer, click 'Download Installer' in the 'Add this computer' tab.
Admin of an account can remove all computers from the account, if so desired, but users can only remove a single computer.
To remove computers,
For admin:
- Log in to Remote Desktop via web browser.
- From the 'Computers' tab, click the 'Remove Computer' button.
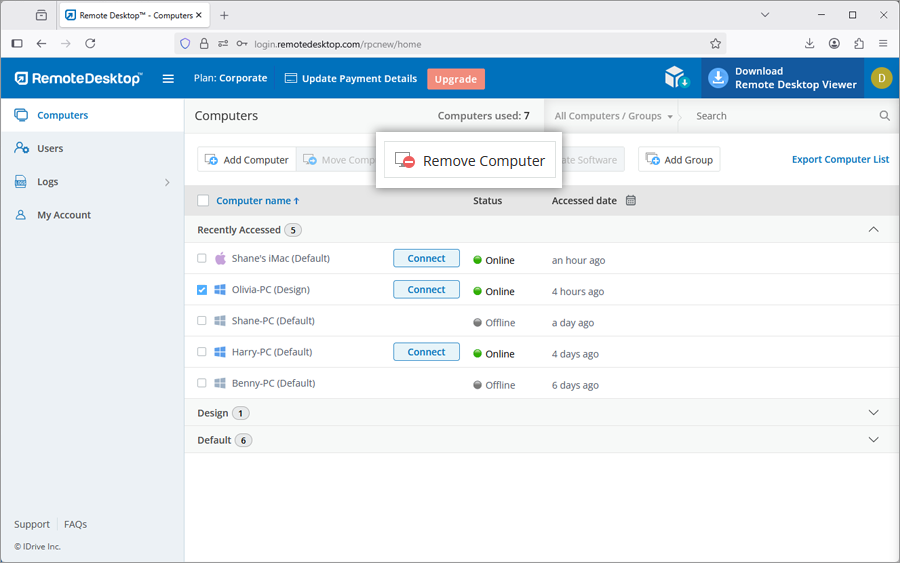
- A pop up confirming the same would appear. Click 'Remove'.
- In the next window, you can view the computers selected by you for deletion. You can remove the computers from the selected list.
- Click 'Yes' to proceed with removing the computers from your account.
For users:
- Log in to Remote Desktop via web browser.
- From the 'Computers' tab, select the computers you wish to remove.
- Click 'Remove Computer'.
Note: Computers that are in session cannot be removed.
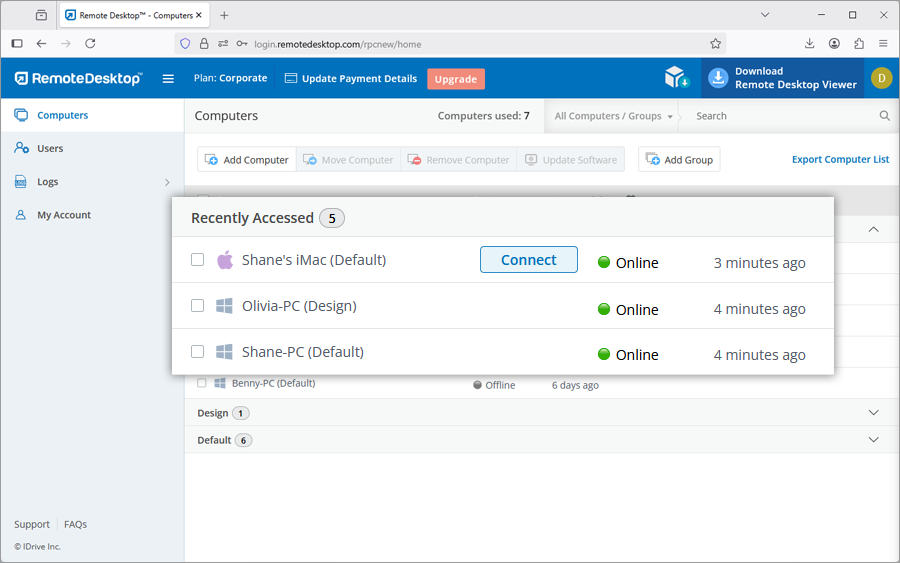
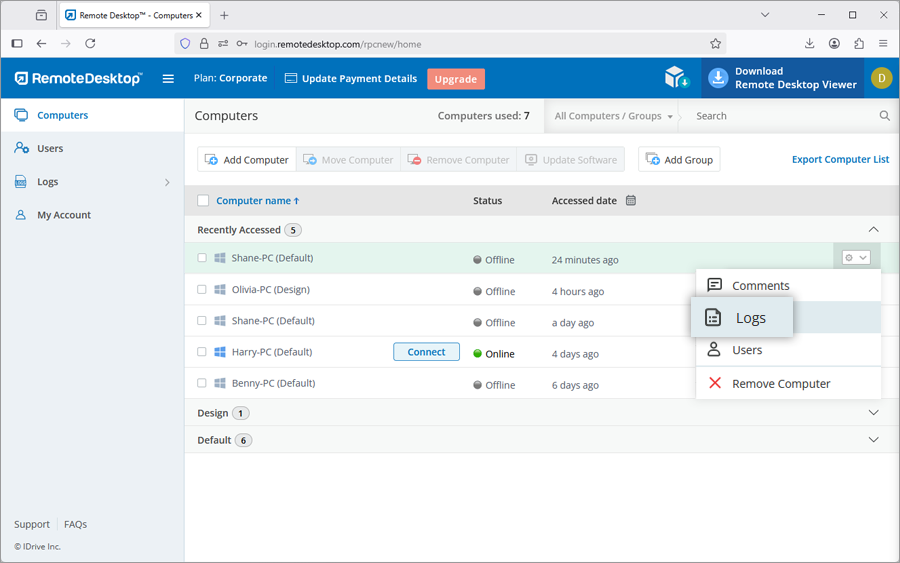
You can view up to 10 recently accessed computers in the 'Recently Accessed' section of the 'Computers' tab. The computers are listed with their status, IP address of the computer it was last accessed from, and the last accessed date and time. You can remotely connect to an online computer in this section directly by clicking 'Connect'.
You can view the session-related logs for each computer in your account.
To view session logs for a computer,
- Log in to Remote Desktop via web browser and go to the 'Computers' tab.
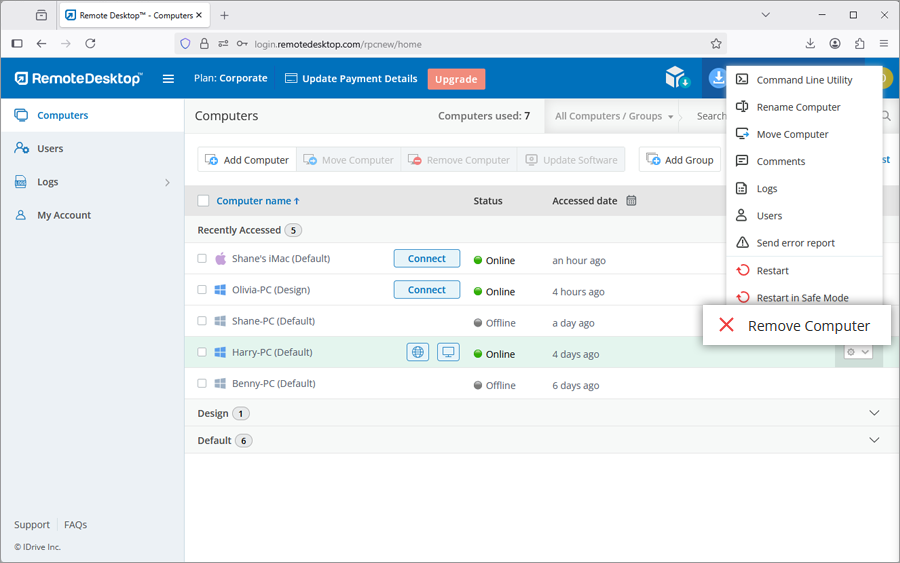
- Hover on the computer you wish to check the logs and click
 .
. - Click 'Logs' to view all the session logs.
Yes, if the latest Remote Desktop software is not installed on your Windows and Mac systems, you can remotely update the software.
To update Remote Desktop software remotely,
- Log in to Remote Desktop via web browser and go to the 'Computers' tab.
- Hover on the PC or Mac you wish to update the software and click .
- Click 'Update Software'.
- In the popup, click 'Update' to proceed. The computer will briefly go offline and will be back online once the update is complete.
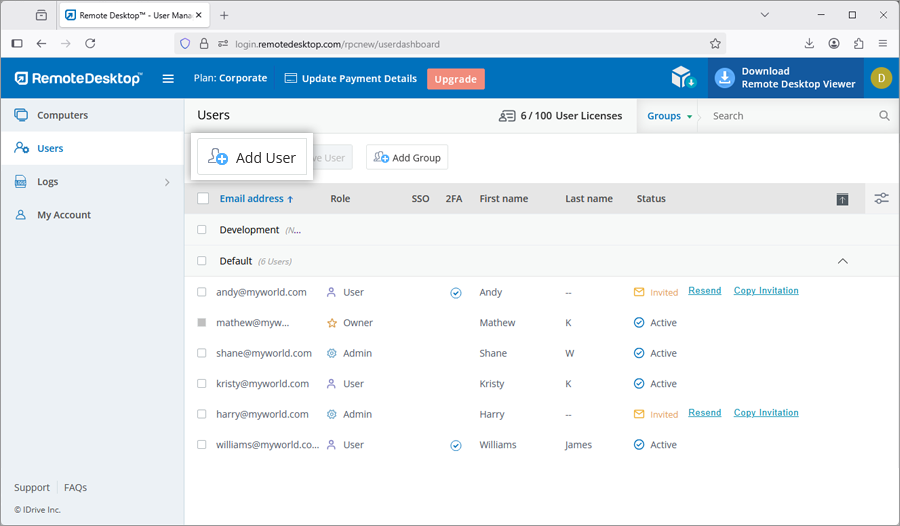
Yes, as an Admin of Corporate account, you can add users to your account, grant them admin rights and deployment permissions.
To add users,
- Log in to Remote Desktop via web browser.
- Go to the 'Users' tab and click 'Add User'.
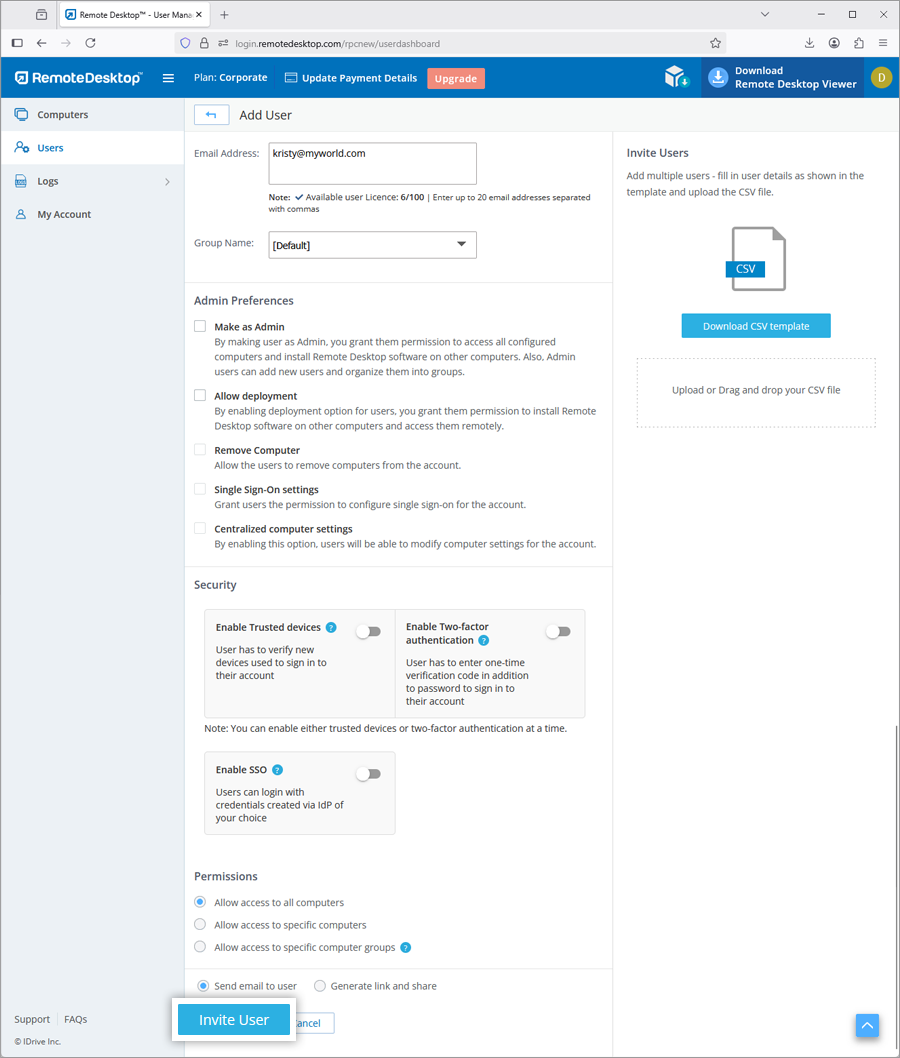
- Enter the user email address in the 'Email Address' field.
- Select the group from the 'Group Name' drop-down list to add users to the particular group.
- Select from the following preferences:
Admin Preferences
- Make as Admin - Grant admin permissions to the user and choose from the following admin preferences:
- Remove Computer - To grant users the permission to delete computers from the account.
- Single Sign-On settings - To enable users to configure single sign-on for the account.
- Centralized computer settings - To give users the permission to modify computer settings for the account.
- Allow deployment - To allow users to install the Remote Desktop application on their computer.
Permissions
- Allow access to all computers - To give users the permission to access all computers.
- Allow access to specific computers - To give users the permission to access only the selected computers.
- Allow access to specific groups - To give users the permission to access only the selected groups.
Note: Users with group access will not be allowed to deploy Remote Desktop software on other computers.
- Make as Admin - Grant admin permissions to the user and choose from the following admin preferences:
- Click 'Invite User'.
The invited user will get an email with the link to register to Remote Desktop. Once the user registers, their account will be added to your account.
Yes, you can add multiple users to your Remote Desktop account at a time by uploading a CSV file.
To invite users,
- Log in to Remote Desktop via web browser.
- Go to the 'Users' tab and click 'Add User'.
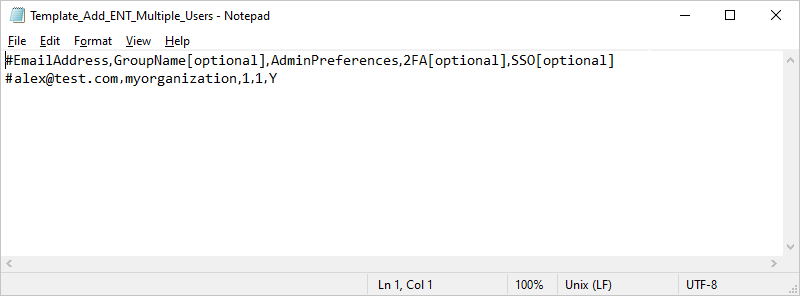
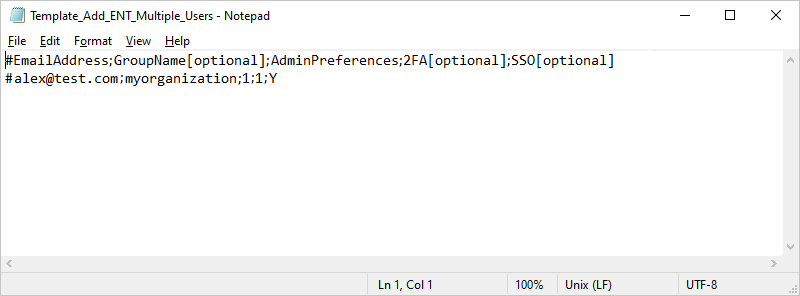
- Click the 'Download CSV template'.
- Open the file, delete the sample entry and add the information for your users in any of the following formats (one line per user):
"EmailAddress,GroupName,AdminPreferences,2FA,SSO""EmailAddress;GroupName;AdminPreferences;2FA;SSO"
- Save the modified file.
- Drag and drop your saved CSV file onto the 'Upload or Drag and drop your CSV file' area. Alternatively, click the area to browse for your CSV file and upload.
- In the popup that appears, click 'Add Users'.
- A confirmation message appears after adding the users.

The invited users will get an email with the link to register to Remote Desktop. Once the users register, their account will be added to your account.
Yes, as an Admin you can assign or unassign computers to users.
To assign/unassign computers,
- Log in to Remote Desktop via web browser and go to the 'Users' tab.
- Hover on the user you wish to edit and click
 .
. - Select the 'Allow access to specific computers' radio button from the 'Permissions' section.
- Select the computers you want to assign, or deselect the computers you wish to unassign from the 'Computer Name' section and click 'Save'.

Alternatively,
- Go to the 'Computers' tab.
- Hover on the computer you wish to edit and click .
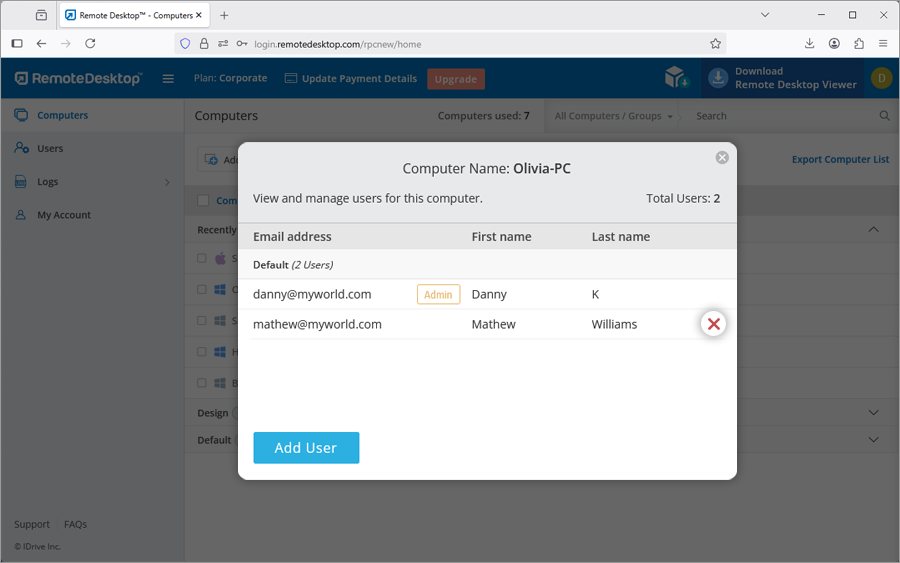
- Click 'Users'. A popup, with a list of users assigned to the computer, will appear.
- Click 'Add Users'. The list of users who have not been assigned the computer will appear.
- Select the users you wish to assign and click 'Add'.
- To unassign users, click
 against the usernames you wish to unassign.
Yes, as an Admin you can edit user permissions.
To edit,
- Log in to Remote Desktop via web browser and go to the 'Users' tab.
- Hover on the user you want to edit and click
 .
. 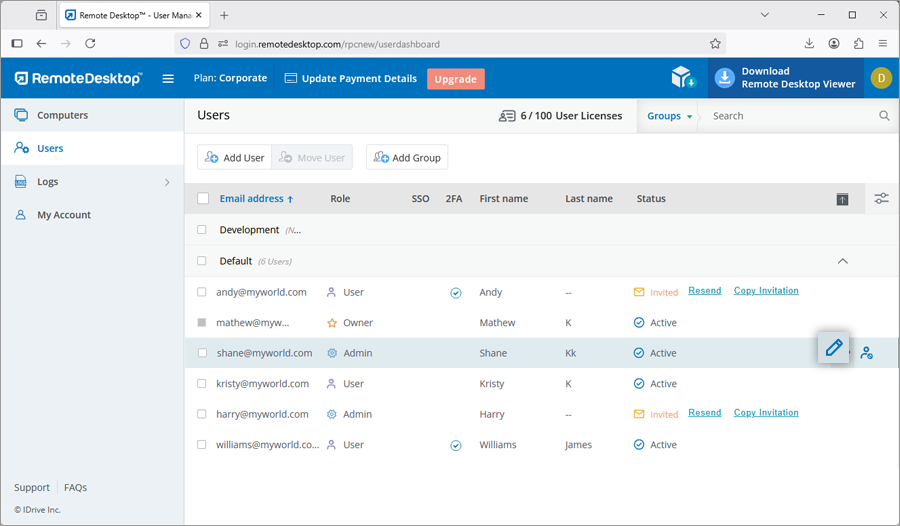
- Make the required changes in the 'Preferences' and 'Permissions' section.
- Click 'Save'.
To reset / remove the Personal Key,
- Launch the Remote Desktop application on the computer you wish to reset the Personal Key.
- Log in to your account.
- Right-click the computer name, and click 'Edit/Remove Personal Key'.
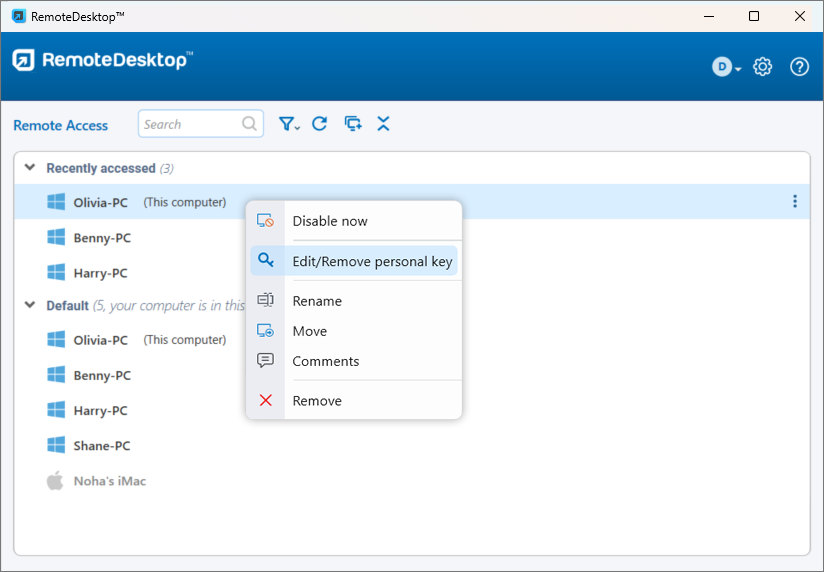
- Enter the new Personal Key and confirm the same. Click 'Change'.
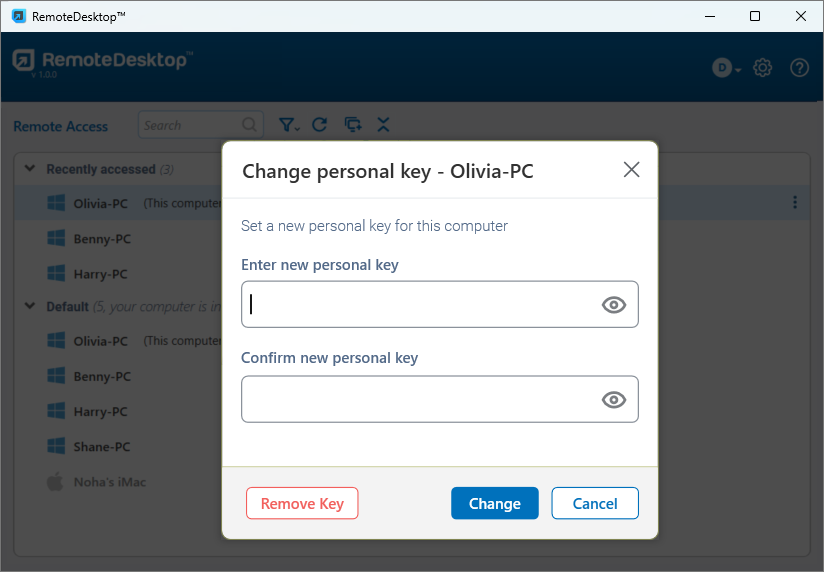
- If you wish to connect to the computer without a Personal Key, click 'Remove Key'.
To delete users,
- Log in to Remote Desktop via web browser and go to the 'Users' tab.
- To delete a single user, hover on the user you want to delete and click
 .
. - To delete multiple users from the list, select the users, click 'Actions', and select 'Delete Users'.
- Click 'Yes' in the confirmation window.
How can I set the host screen to blank out and block input during a remote session, and automatically lock when the session ends?
In order to apply these viewer menu options to the users by default, you need to create a 'Preference Policy' and apply it to the target computers. Within the policy, enable the preferred security settings to ensure enhanced privacy and control during remote sessions.
To learn how to create a Preference Policy, refer to this FAQ.
Note: For Premium and Corporate accounts, viewer menu options selected during a remote session are automatically saved and will be applied in subsequent sessions.
A group is a collection of users/computers organized together by the Admin. A user or computer cannot be added to more than one group.
To create a group,
- Log in to Remote Desktop via web browser.
- Click 'Add Group' displayed in the menu bar.
- Enter a name in the 'Group name' field.
- You can choose to include users or computers.
- Click 'Add'.
Yes, you can move users between groups.
To move,
- Log in to Remote Desktop via web browser and go to the 'Users' tab.
- Select the user(s) to move and click 'Move User'.
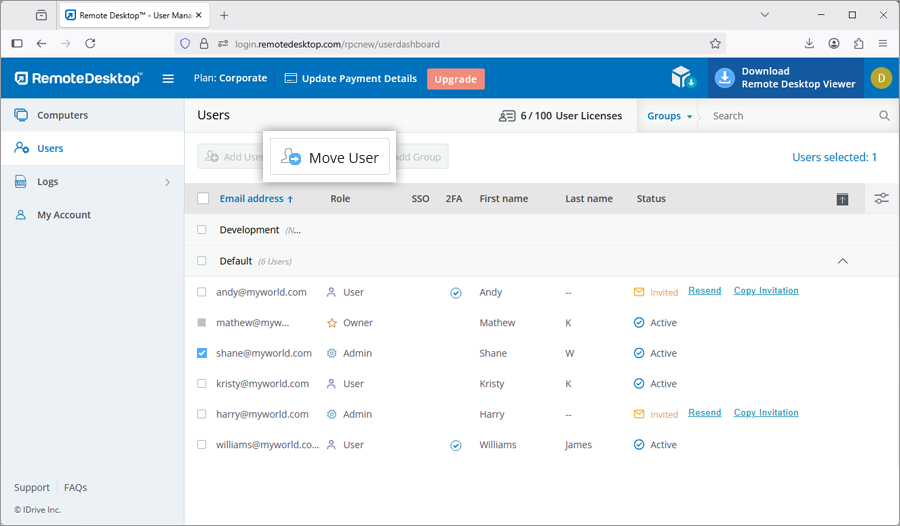
- The 'Move User' window appears. Select the required group from the 'Group name' drop-down list.
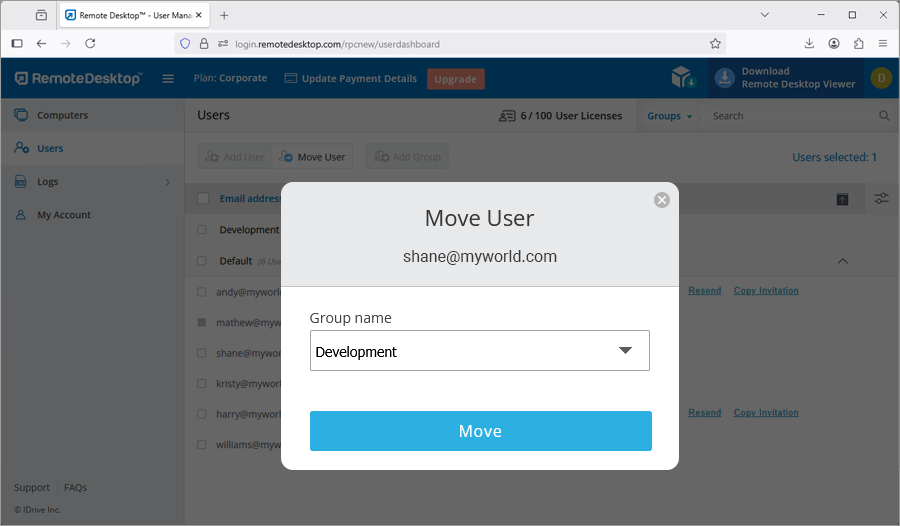
- Click 'Move'.
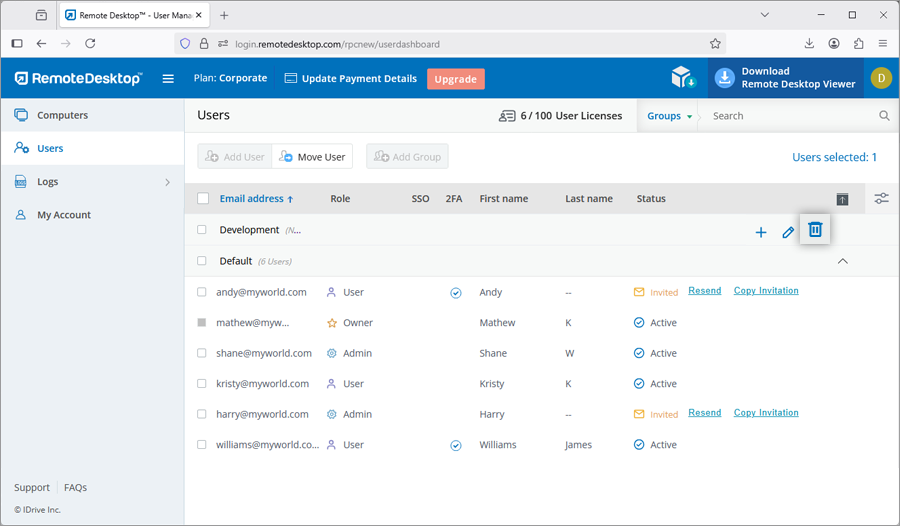
To delete a user group,
- Log in to Remote Desktop via web browser.
- Go to the 'Users' tab. The list of groups and associated users appears.
- Hover on the group you want to delete and click
 .
. - Click 'Ok' in the confirmation window.
To delete a computer group,
- Log in to Remote Desktop via web browser. The list of groups and associated computers appears.
- Hover on the group you want to delete and click .
- The 'Add / Remove computers' page appears. Click 'Delete'.
- A confirmation window appears. Click 'Ok'.
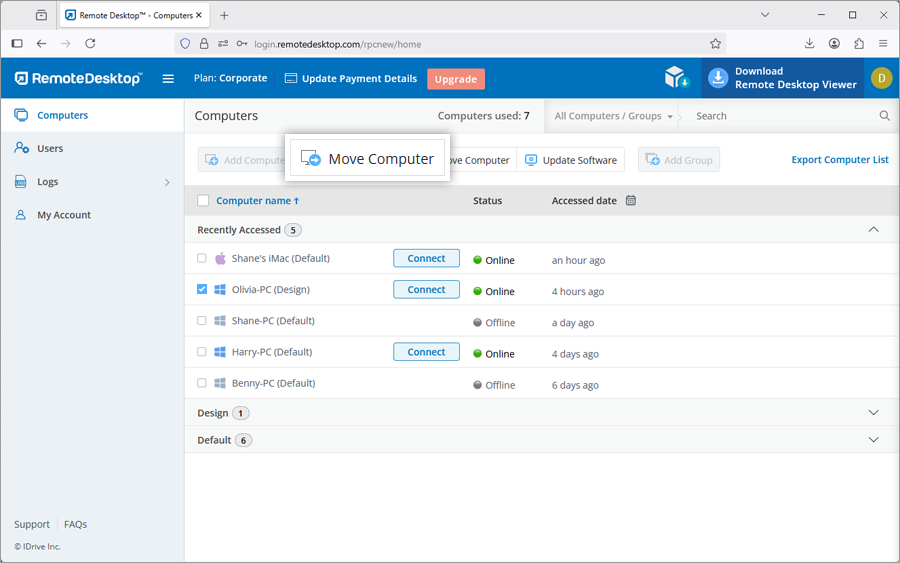
To move computers to an existing group,
- Log in to Remote Desktop via web browser.
- Select the computers you want to move and click 'Move Computer'.
- Select the required group name and click 'Move'.
Yes, you can move computers between groups.
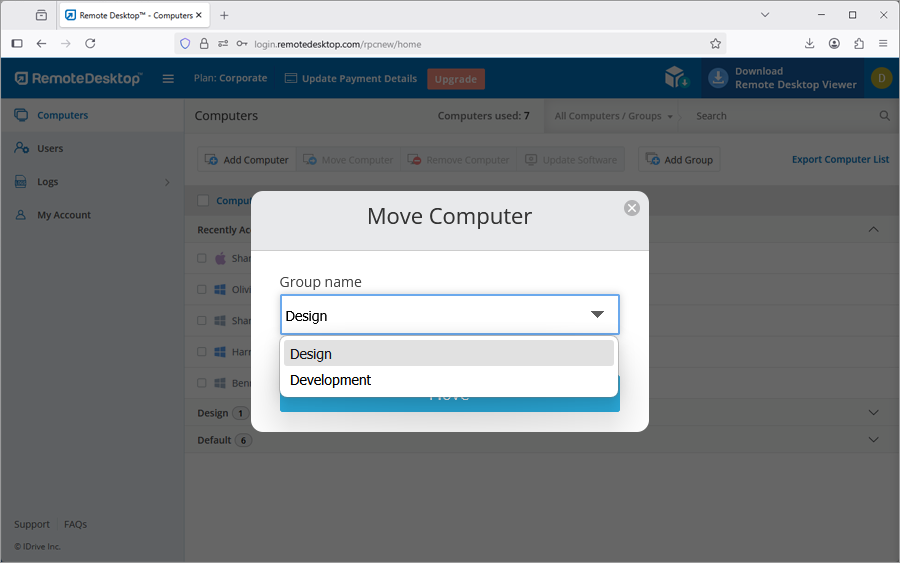
To move multiple computers,
- Log in to Remote Desktop via web browser.
- Select the computers you want to move and click 'Move Computer'.
- Select the group from the 'Group name' drop-down list and click 'Move'.
To move an individual computer,
- Click corresponding to the computer and click 'Move Computer'.
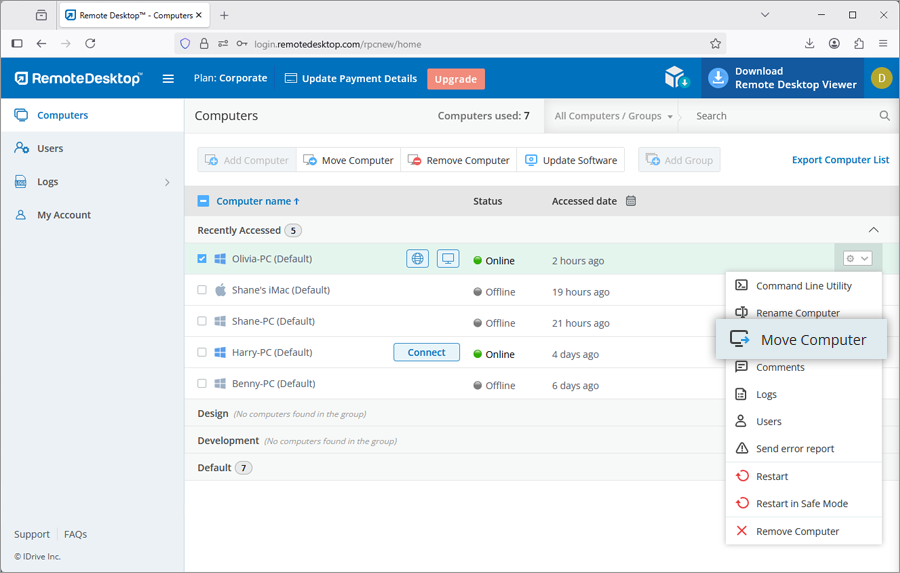
- Select the group from the 'Group name' drop-down list and click 'Move'.
Run the following commands in the command prompt to install the Remote Desktop.msi file.
To install Remote Desktop Host,
- Launch command prompt in administrator mode.
- Ensure that the path is: C:\WINDOWS\system32
- Execute the command:
msiexec.exe /i <remotedesktop.msi path> /qn ID=<Configuration ID> GROUPNAME=<group name> PERSONALKEY=<personal key> HIDETRAY=<0 or 1> CONNECT_PERMISSION=<0 or 1 or 2 or 3> REMOVE_WALLPAPER=<0 or 1> DISABLE_AERO_THEME=<0 or 1> DISABLE_FONT=<0 or 1> DISABLE_SLEEP_MODE=<0 or 1> HARDWARE_ACCELERATION=<0 or 1> CONNECT_TO_ACTIVE_SESSION=<0 or 1> SHOW_WHO_IS_ACCESSING=<0 or 1> LOCK_ON_SESSION_END=<0 or 1> LOCAL_PROXY_IP=192.168.3.176 LOCAL_PROXY_PORT=801 LOCAL_PROXY_USERNAME=test LOCAL_PROXY_PASSWORD=test ENABLE_DISABLE_PRINTER=<0 or 1> COMPUTERNAME=<Computer Name>
For example:C:\WINDOWS\system32>msiexec.exe /i "C:\Users\TestUser\Desktop\RPCMSI\remotedesktop.msi" /qn ID=uKjNNpkSWo1pnE8 GROUPNAME=GRPOne PERSONALKEY=test1234 HIDETRAY=1 CONNECT_PERMISSION=3 REMOVE_WALLPAPER=1 DISABLE_AERO_THEME=1 DISABLE_FONT=1 DISABLE_SLEEP_MODE=1 HARDWARE_ACCELERATION=1 CONNECT_TO_ACTIVE_SESSION=1 SHOW_WHO_IS_ACCESSING=1 LOCK_ON_SESSION_END=0 LOCAL_PROXY_IP=192.168.3.176 LOCAL_PROXY_PORT=801 LOCAL_PROXY_USERNAME=test LOCAL_PROXY_PASSWORD=test ENABLE_DISABLE_PRINTER=0 COMPUTERNAME="Server 2019"
If you are unable to install Remote Desktop, go to the Control Panel, uninstall Remote Desktop setup and run the commands again. Alternatively, run the following reinstallation commands.
To reinstall / overwrite installation
- Launch command prompt in administrator mode.
- Ensure that the path is: C:\WINDOWS\system32
- Execute the command:
Latest version of Remote Desktop MSI:msiexec.exe /i <remotedesktop.msi path> /qn ID=<Configuration ID> GROUPNAME=<group name> PERSONALKEY=<personal key> HIDETRAY=<0 or 1> CONNECT_PERMISSION=<0 or 1 or 2 or 3> REMOVE_WALLPAPER=<0 or 1> DISABLE_AERO_THEME=<0 or 1> DISABLE_FONT=<0 or 1> DISABLE_SLEEP_MODE=<0 or 1> HARDWARE_ACCELERATION=<0 or 1> CONNECT_TO_ACTIVE_SESSION=<0 or 1> SHOW_WHO_IS_ACCESSING=<0 or 1> LOCK_ON_SESSION_END=<0 or 1> LOCAL_PROXY_IP=192.168.3.176 LOCAL_PROXY_PORT=801 LOCAL_PROXY_USERNAME=test LOCAL_PROXY_PASSWORD=test ENABLE_DISABLE_PRINTER=<0 or 1> REINSTALMODE="aecmus" REINSTALL="ALL" COMPUTERNAME=<Computer Name>For example:
C:\WINDOWS\system32>msiexec.exe /i "C:\Users\TestUser\Desktop\RPCMSI\remotedesktop.msi" /qn
ID=uKjNNpkSWo1pnE8 GROUPNAME=GRPOne PERSONALKEY=test1234
HIDETRAY=1 CONNECTPERMISSION=3 REMOVE_WALLPAPER=1 DISABLE_AERO_THEME=1 DISABLE_FONT=1 DISABLE_SLEEP_MODE=1 HARDWARE_ACCELERATION=1 CONNECT_TO_ACTIVE_SESSION=1 SHOW_WHO_IS_ACCESSING=1 LOCK_ON_SESSION_END=0 LOCAL_PROXY_IP=192.168.3.176 LOCAL_PROXY_PORT=801 LOCAL_PROXY_USERNAME=test LOCAL_PROXY_PASSWORD=test ENABLE_DISABLE_PRINTER=0 REINSTALMODE="aecmus" REINSTALL="ALL" COMPUTERNAME="Server 2019"Note: Add /qn for silent installation.
Note:
- COMPUTERNAME should be between 1 to 50 characters.
- Group names should be less than or equal to 20 characters.
- In the case of misplaced special character, the machine will be moved to the 'Default' group.
- In case the group name does not exist, a new group will be created with the submitted name and the computer will be assigned to it.
You can predefine optional parameters for the remote computer during installation.
| Parameters | Description |
|---|---|
| ID | This is a mandatory parameter and you can find it under Deploy Package > Group deployment via MSI > Configuration ID in your Remote Desktop account |
| PERSONALKEY | Set a 'Personal Key', which acts as a secondary password, for the remote computer |
| GROUPNAME | Name of the group in which the computer will be assigned * |
| COMPUTERNAME | Name of the machine assigned to the host |
| UNINSTALL | Uninstall Remote Desktop host using the MSI command UNINSTALL=yes Note: Do not combine this with other parameters |
| HIDETRAY | |
| 1 | Enabling this option will prevent users from accessing the tray options on their remote computers |
| 0 | Unhide tray and allow users to access tray options |
| CONNECT_PERMISSION | |
| 0 | Connection request permission is disabled |
| 1 | Automatically decline connection in the login screen after the request expires |
| 2 | Automatically allow connection in the login screen after the request expires |
| 3 | Allow connection after the request expires |
| REMOVE_WALLPAPER | |
| 1 | Enabling this option will remove the wallpaper during remote session |
| 0 | Wallpaper is displayed during remote session |
| DISABLE_AERO_THEME | |
| 1 | Disable the aero theme during remote session |
| 0 | Aero theme remains active during remote session |
| DISABLE_FONT | |
| 1 | Font smoothing is disabled during the remote session |
| 0 | Font smoothing is enabled |
| DISABLE_SLEEP_MODE | |
| 1 | Disable sleep mode when host is configured |
| 0 | If this option is disabled, the remote computer will go to sleep mode after a specific time. |
| HARDWARE_ACCELERATION | |
| 1 | Use hardware acceleration during the remote session |
| 0 | Hardware acceleration is disabled |
| CONNECT_TO_ACTIVE_SESSION | |
| 1 | Enabling this option will allow users to connect to active RDP sessions on Windows hosts |
| 0 | Connection to an active session is disabled |
| SHOW_WHO_IS_ACCESSING | |
| 1 | Show notification for who is accessing during a remote session |
| 0 | Hide notification for who is accessing during a remote session |
| LOCK_ON_SESSION_END | |
| 1 | System will lock after the session ends |
| 0 | System will not lock after the session ends |
| LOCAL_PROXY | Users can pass local proxy details as parameters |
| LOCAL_PROXY_IP = 192.168.3.176 | |
| LOCAL_PROXY_PORT = 801 | |
| LOCAL_PROXY_USERNAME = test | |
| LOCAL_PROXY_PASSWORD = test | |
| ENABLE_DISABLE_PRINTER | |
| 1 | Remote printing will be enabled |
| 0 | Remote printing will be disabled |
*Note:
- COMPUTERNAME should be between 1 to 50 characters.
- In case the group name does not exist, a new group will be created with the submitted name and the computer will be assigned to it.
- If the computer already exists in any other group, it will be moved to the new group specified by the user.
Run the following commands in the command prompt to install the RemoteDesktopViewer.msi file.
To install Remote Desktop Viewer,
- Launch command prompt in administrator mode.
- Ensure that the path is: C:\WINDOWS\system32>
- Execute the command:
msiexec.exe /i <RemoteDesktopViewer.msi path> /qn PRODUCTNAME=viewer
For example:
msiexec.exe /i "C:\Users\Test\Desktop\MSI\UN\RemoteDesktopViewer.msi" /qn PRODUCTNAME=viewer
To uninstall Remote Desktop Viewer,
- Launch command prompt in administrator mode.
- Ensure that the path is: C:\WINDOWS\system32
- Uninstall Remote Desktop Viewer using the command:
msiexec.exe /i <RemoteDesktopViewer.msi path> /qn PRODUCTNAME=viewer UNINSTALL=yes
For example:
msiexec.exe /i "C:\Users\Test\Desktop\MSI\UN\RemoteDesktopViewer.msi" /qn PRODUCTNAME=viewer UNINSTALL=yes
You can predefine optional parameters for the remote computer during installation.
| Parameters | Description |
|---|---|
| PRODUCTNAME | Product name must be mentioned as 'viewer' to install the Remote Desktop Viewer application. |
| UNINSTALL | Include this parameter along with PRODUCTNAME= viewer to uninstall Remote Desktop viewer using the MSI command UNINSTALL=yes |
To uninstall Remote Desktop host using MSI,
- Launch command prompt in administrator mode.
- Ensure that the path is: C:\WINDOWS\system32
- Uninstall Remote Desktop host using the command:
msiexec.exe /i <remotedesktop.msi path> /qn UNINSTALL=yes
For Example:
msiexec.exe /i "C:\Users\Test\Desktop\MSI\UN\remotedesktop.msi" /qn UNINSTALL=yes
To create a preference policy,
- Log in to your Remote Desktop account.
- Click Deploy Package at the top right corner.
- Go to Preference Policy and click Create Policy.
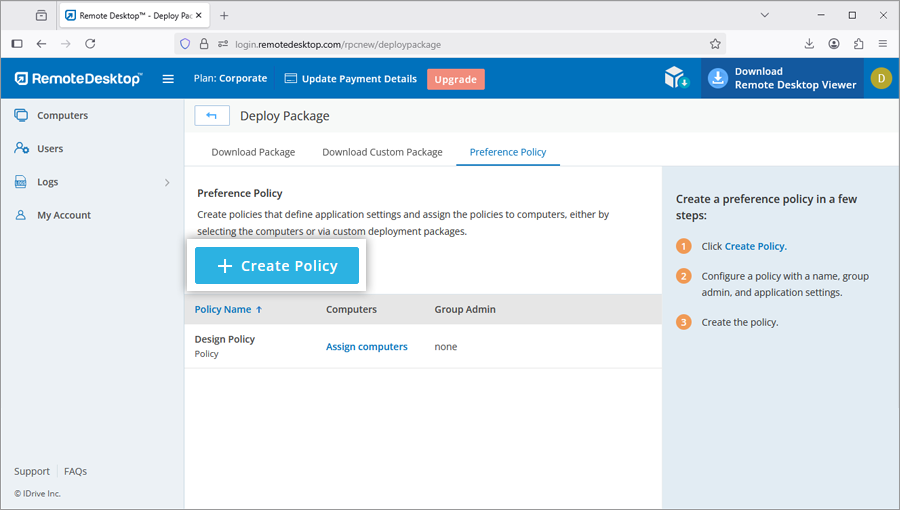
- Enter a policy name and description.
- Select an admin for the group. This is optional.
- Configure general, security, and capability control settings under the following sections. The settings defined by the admin here will automatically apply to all the computers assigned to the policy.
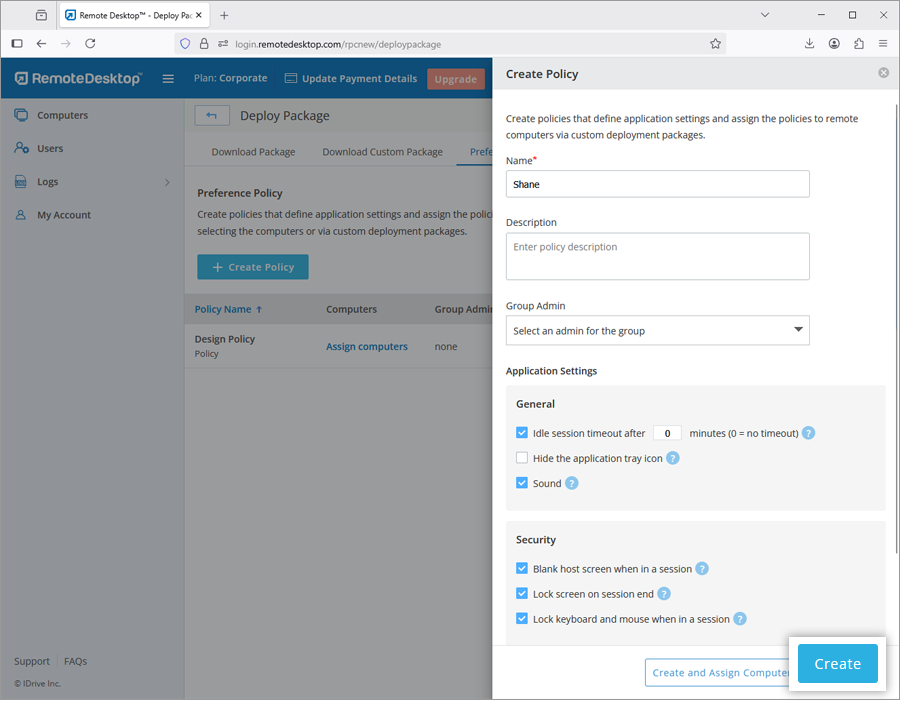
- Idle session timeout after (X) minutes (0 = no timeout):
Specify an idle timeout to automatically end the remote session after inactivity. - Hide the application tray icon:
Select this option to hide the application icon from the system tray. - Sound:
Select this option to listen to remote audio output over the connection. - Blank host screen when in a session:
Select this option to prevent others from seeing the remote screen during the session. - Lock screen on session end:
Select this option to lock the remote computer as soon as the session ends. - Lock keyboard and mouse when in a session:
Select this option to lock all inputs from the remote mouse and keyboard during the session. - Allow file transfer, drag and drop, and universal clipboard:
Select this option to allow file transfer using the file transfer, drag and drop, or copy-paste options.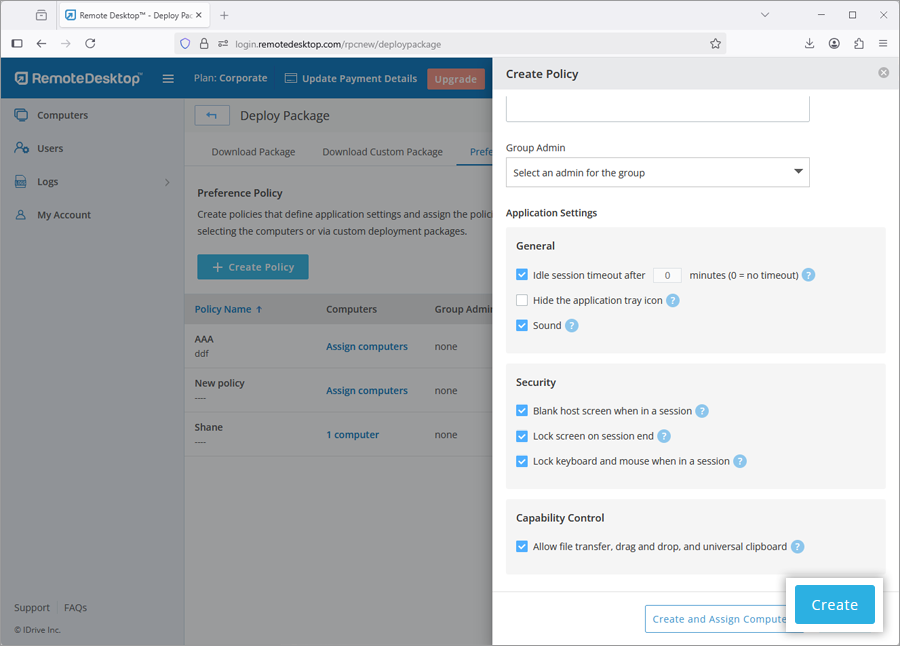
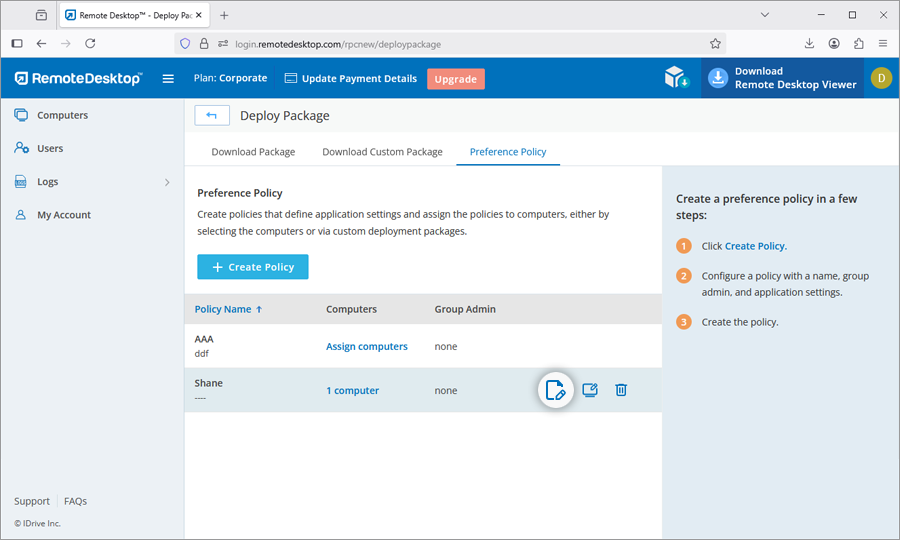
- Click Create to create the preference policy. The policy will be added to the list of preference policies.
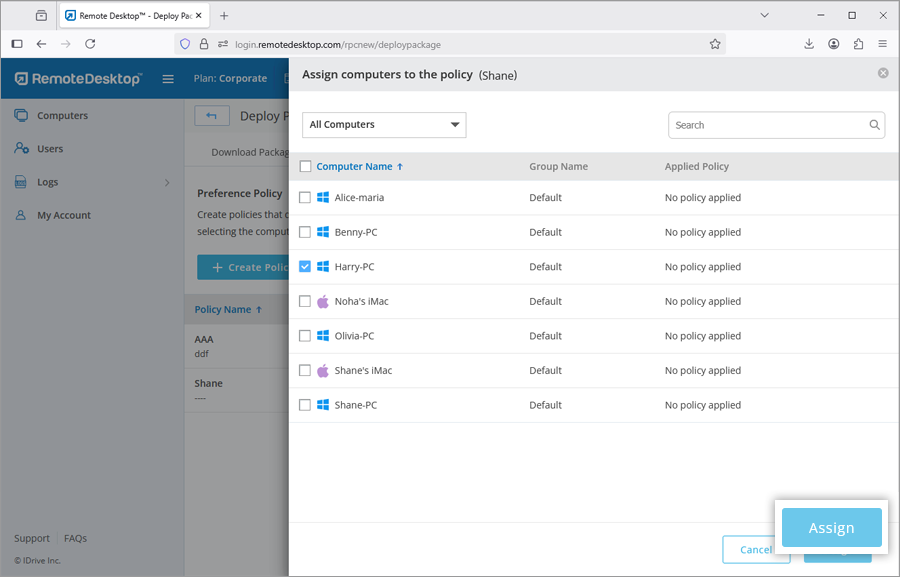
- You can click Assign Computers beside the policy to add computers to the policy.Alternatively, click Create and Assign Computers to create the policy and push it to the required computers.
General
Security
Capability Control
To edit the policy, click ![]() beside the policy you wish to edit.
beside the policy you wish to edit.
Note: Once preference policies are applied by the admin, users will not be able to change these settings during a remote session.
To create a custom deployment package,
- Log in to your Remote Desktop account.
- Click Deploy Package at the top right corner.
- Go to Download Custom Package and click Create Deployment Package.
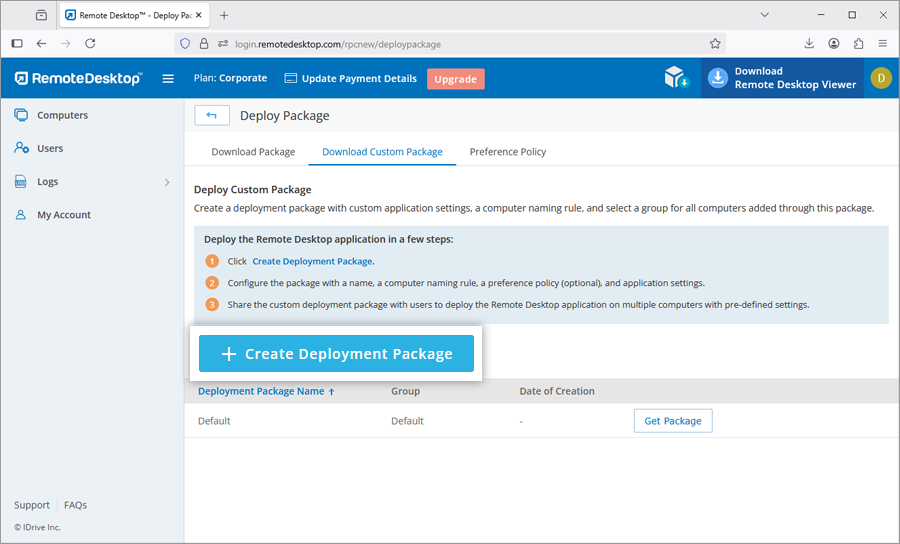
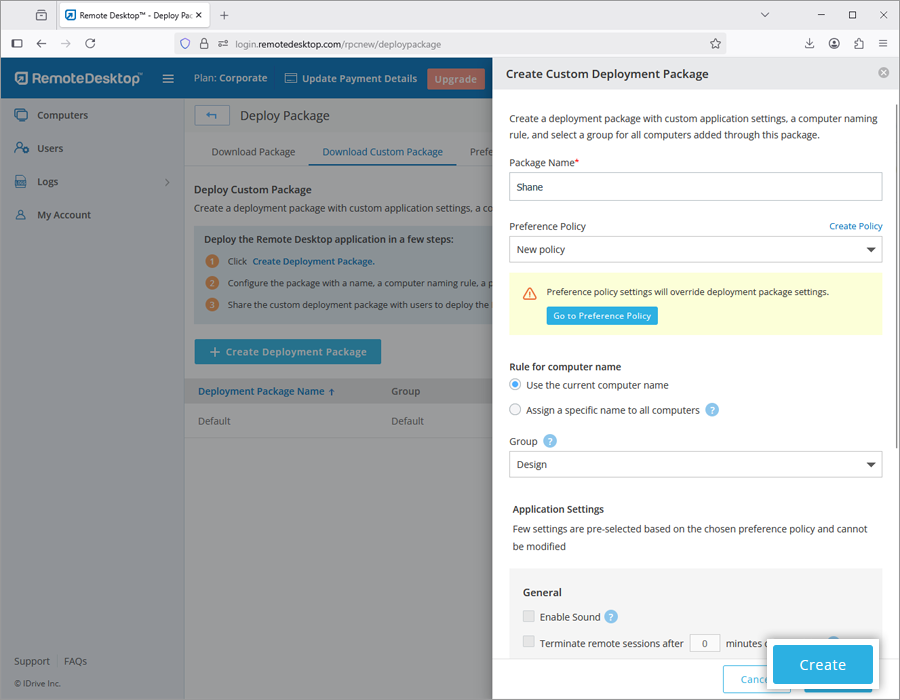
- Configure the package with a name, a computer naming rule, a preference policy (optional), and application settings.
Note: In case a preference policy is selected, few settings are pre-selected based on the chosen preference policy and cannot be modified. - Click Create. The deployment package will be created.
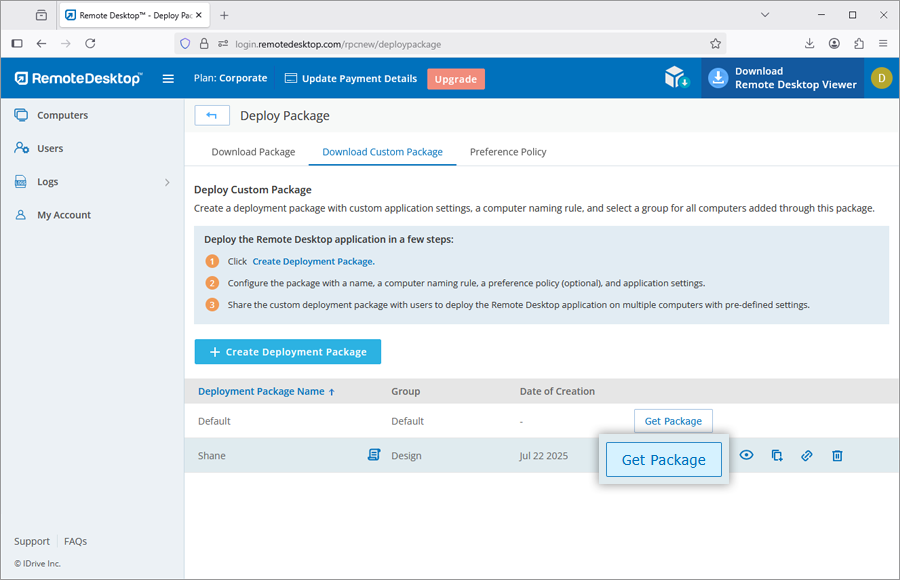
- Download the package on the required computer or copy and share the link with users to deploy the package on computers.
Alternatively, you can access the package later from the Deploy Custom Package tab by clicking Get Package.
Yes, you can deploy Remote Desktop using a Configuration ID.
To deploy Remote Desktop,
- Log in to Remote Desktop and download the MSI file.
- Open the command prompt window in the administrator mode (c:\windows\system32).
- Copy the configuration ID that is displayed on the right-corner of the page.
- Run this ID in the command prompt for deployment to connected computers.
If there is any problem while attempting to deploy Remote Desktop via GPO or if the deployment fails, you may receive error 1274 / error 1612 in the 'Event Viewer' logs.
To resolve the issue,
- Open 'Group Policy Management Editor' on your computer.
- Navigate to 'Settings' > 'Policies' > 'Administrative Templates' > 'System' > 'Logon'.
- Double click 'Always wait for the network at computer startup and logon'.
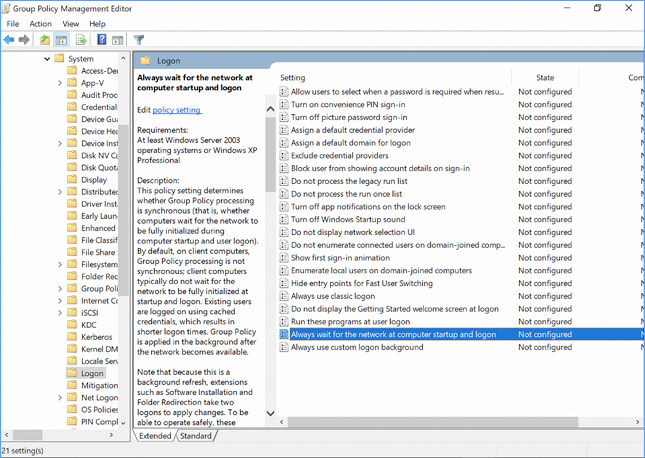
- Select 'Enabled' and click 'OK'.
- Navigate to 'Computer Settings' > 'Administrative Templates' > 'System' > 'Group Policy' and double click 'Startup policy processing wait time'.
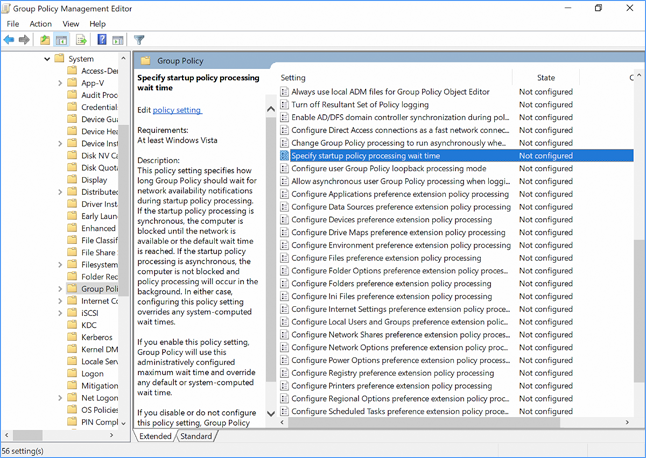
- Enable 'Specify startup policy processing wait time' and configure it to 90 or 120 seconds.
- Go to 'Settings' > 'Policies' > 'Software Settings' > 'Software Installation'.
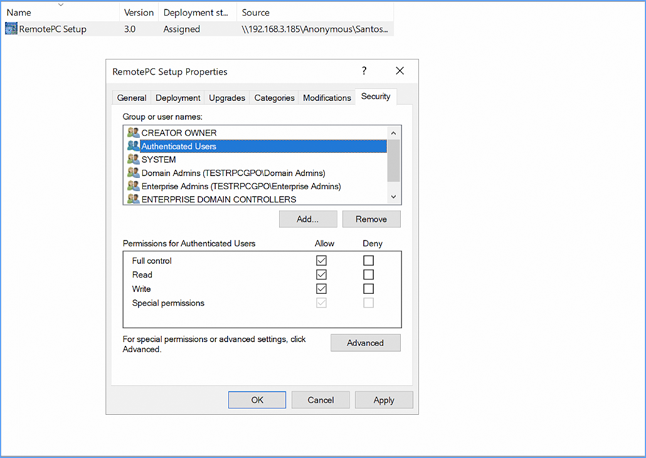
- Right-click on the package and select 'Properties'.
- Select the 'Allow' checkbox against 'Full Control' and click 'OK'.
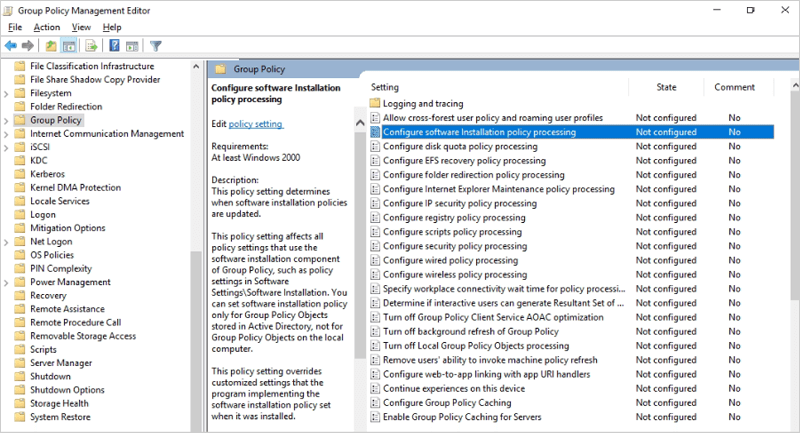
Under Computer Configuration\Policies\Administrative Templates\System\Group Policy,
you need to enable and configure the following 2 options:
- Configure software Installation policy processing: Enable and select the 'Allow processing across a slow network connection' checkbox.
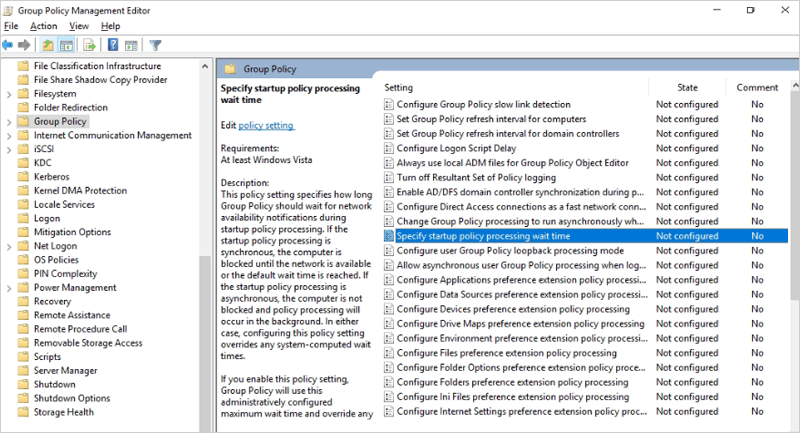
- Specify startup policy processing wait time: Enable and set the 'Amount of time to wait (in seconds)' for 30 seconds.
You need to delete the following GPO registry on the user's computer: HKLM/SOFTWARE/Microsoft/Windows/CurrentVersion/Group Policy
Once you have performed these steps, you may retry Remote Desktop deployment via MSI.
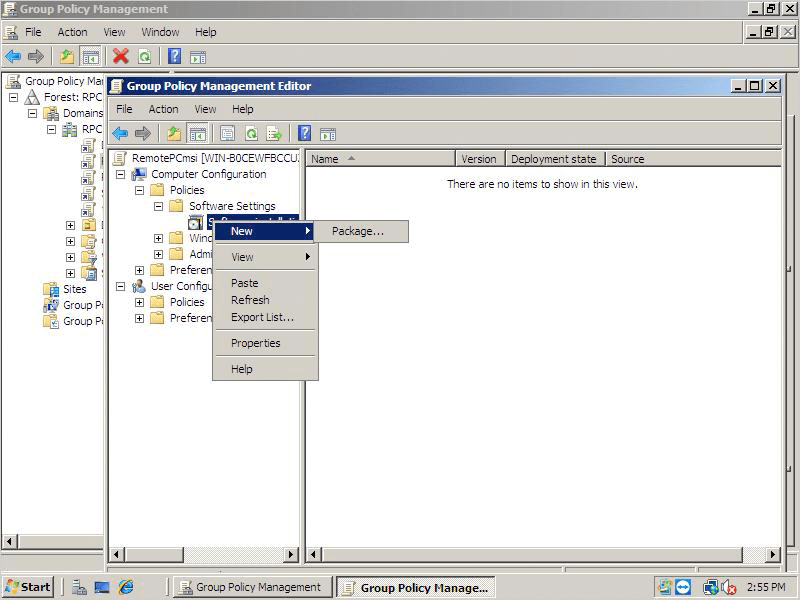
You can deploy Remote Desktop by setting up the Group Policy on the host server.
- Go to 'Group Policy Management Editor', right-click 'Software Installation', select 'New' and add a package.
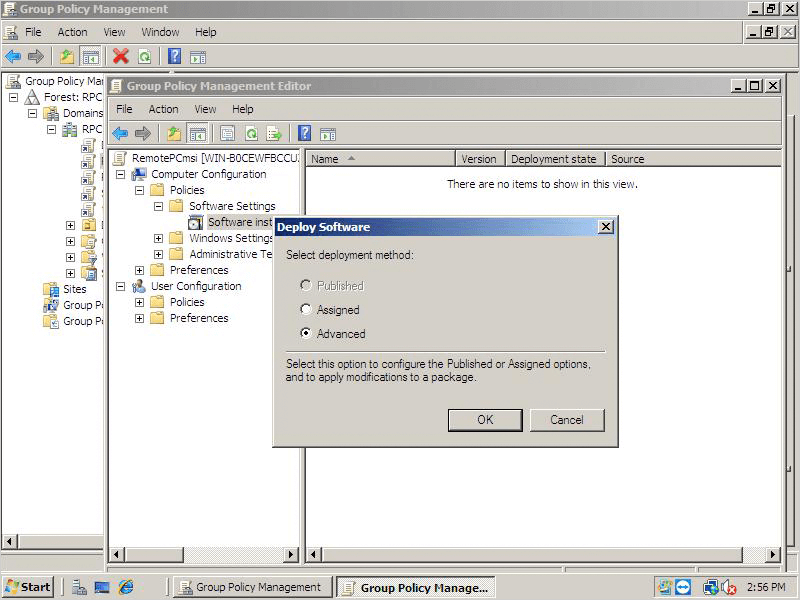
- After selecting the Remote Desktop MSI file, choose the 'Advanced' option in the popup that appears and click 'OK'.
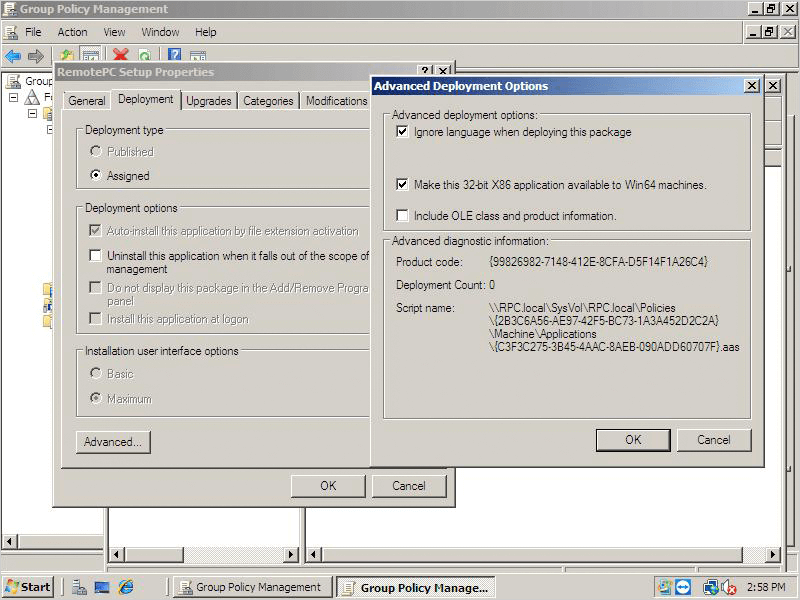
- Go to the 'Advanced Deployment Options' tab, select 'Ignore language when deploying this package'. Click 'OK'.
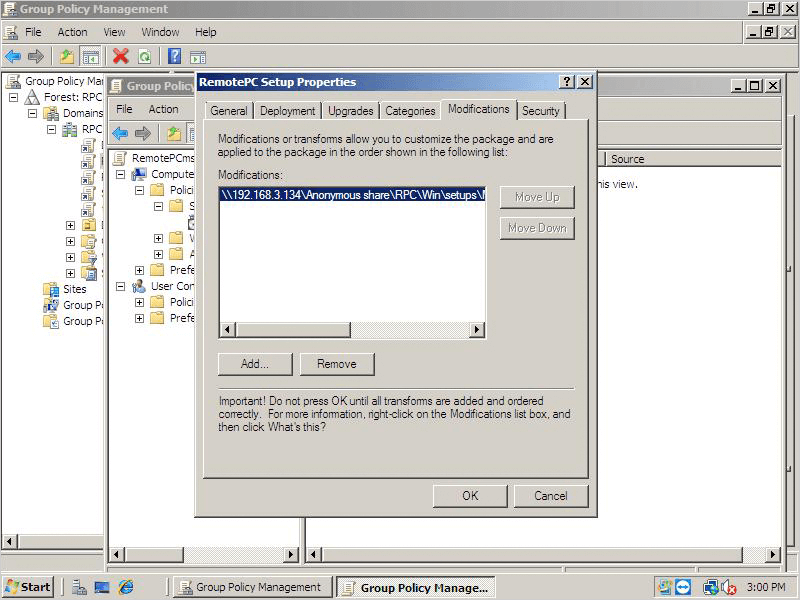
- Go to the 'Modifications' tab in the 'Remote Desktop Setup Properties' section to add the mst file you just created. Click here to know how to create an MST file via Orca tool.
To deploy Remote Desktop on devices,
- Open the command prompt, add the command gpupdate /force then click 'Enter'.
- Reboot the computer (required).
- After system reboot, Remote Desktop will be deployed.
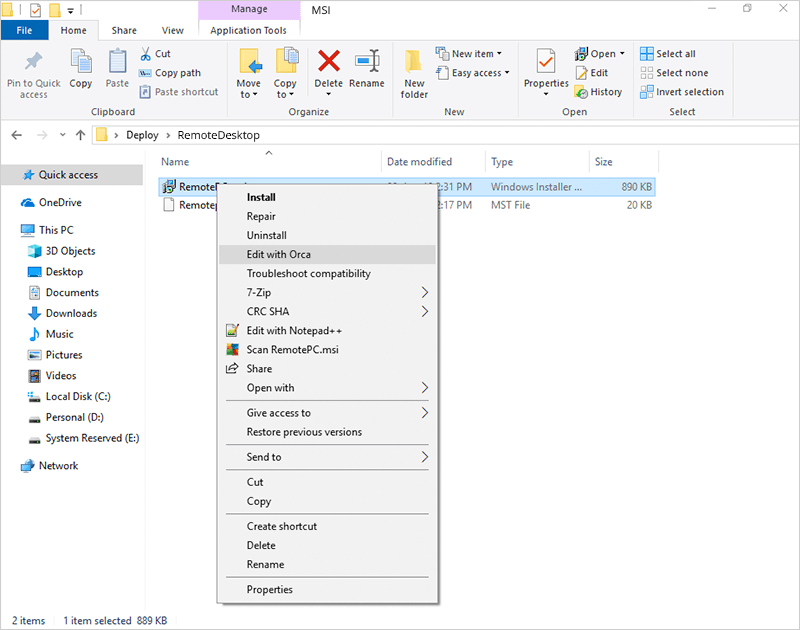
To create a Remote Desktop.mst file,
- Install Orca, the tool used to edit MSI files.
- Download a new RemoteDesktop.msi file.
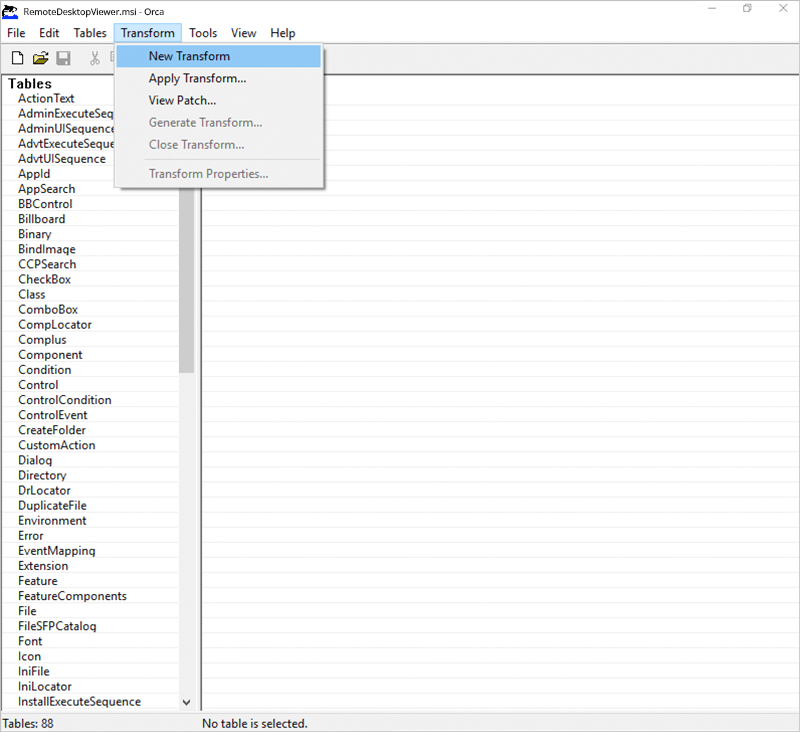
- Open the MSI file location, right-click 'RemoteDesktop.msi', select 'Edit with Orca'.
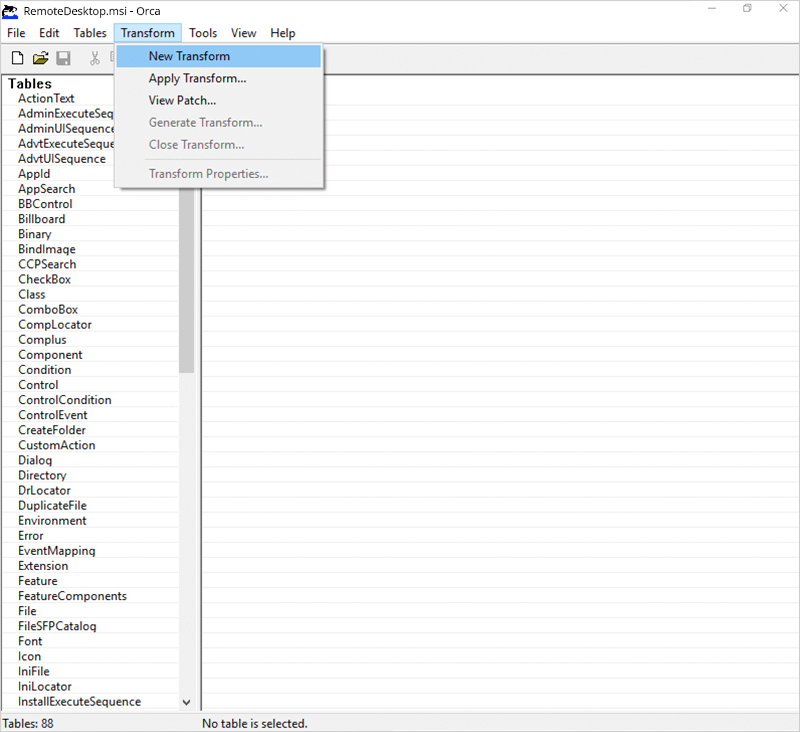
- In the menu that appears, click 'Transform' and then select 'New Transform'.
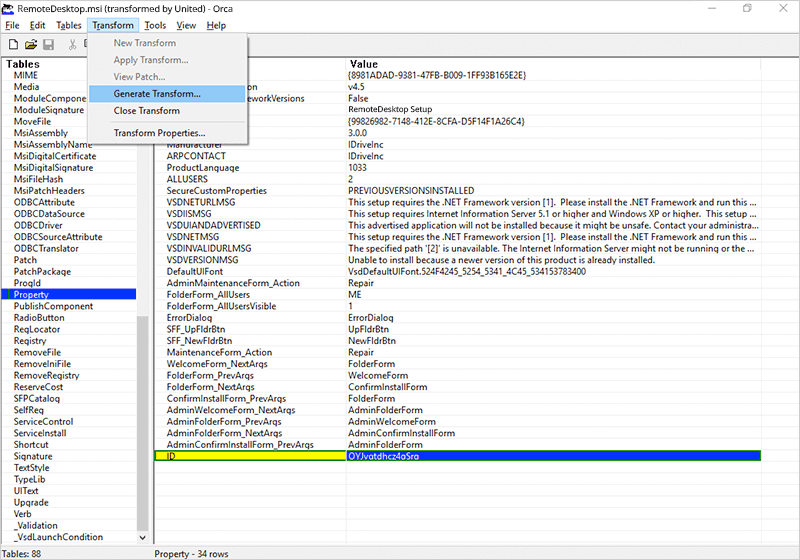
- Navigate to the 'Property Tab' and edit the following:
- In the 'Add Row' tab, add 'Property' as 'ID' and 'Value' as 'Configuration ID', which is a mandatory parameter. In order to configure optional parameters, add additional rows.
- If your deploy URL is https://www.remotedesktop.com/rpcnew/sh/FcXuX3JNRerhvng then the Configuration ID is FcXuX3JNRerhvng
- COMPUTERNAME should be between 1 to 50 characters.
- Group names should be less than or equal to 20 characters.
- In the case of misplaced special character, the machine will be moved to the 'Default' group.
- In case the group name does not exist, a new group will be created with the submitted name and the computer will be assigned to it.
Parameters Description ID This is a mandatory parameter and you can find it under Deploy Package > Group deployment via MSI > Configuration ID in your Remote Desktop account PERSONALKEY Set a 'Personal Key', which acts as a secondary password, for the remote computer GROUPNAME Name of the group in which the computer will be assigned * COMPUTERNAME Name of the machine assigned to the host UNINSTALL Uninstall Remote Desktop host using the MSI command UNINSTALL=yes
Note: Do not combine this with other parametersHIDETRAY 1 Enabling this option will prevent users from accessing the tray options on their remote computers 0 Unhide tray and allow users to access tray options CONNECT_PERMISSION 0 Connection request permission is disabled 1 Automatically decline connection in the login screen after the request expires 2 Automatically allow connection in the login screen after the request expires 3 Allow connection after the request expires REMOVE_WALLPAPER 1 Enabling this option will remove the wallpaper during remote session 0 Wallpaper is displayed during remote session DISABLE_AERO_THEME 1 Disable the aero theme during remote session 0 Aero theme remains active during remote session DISABLE_FONT 1 Font smoothing is disabled during the remote session 0 Font smoothing is enabled DISABLE_SLEEP_MODE 1 Disable sleep mode when host is configured 0 If this option is disabled, the remote computer will go to sleep mode after a specific time. HARDWARE_ACCELERATION 1 Use hardware acceleration during the remote session 0 Hardware acceleration is disabled CONNECT_TO_ACTIVE_SESSION 1 Enabling this option will allow users to connect to active RDP sessions on Windows hosts 0 Connection to an active session is disabled SHOW_WHO_IS_ACCESSING 1 Show notification for who is accessing during a remote session 0 Hide notification for who is accessing during a remote session LOCK_ON_SESSION_END 1 System will lock after the session ends 0 System will not lock after the session ends LOCAL_PROXY Users can pass local proxy details as parameters LOCAL_PROXY_IP = 192.168.3.176 LOCAL_PROXY_PORT = 801 LOCAL_PROXY_USERNAME = test LOCAL_PROXY_PASSWORD = test ENABLE_DISABLE_PRINTER 1 Remote printing will be enabled 0 Remote printing will be disabled Note:
- Go to 'Transform', select 'Generate Transform' to complete the mst creation.
- Deploy with MSI and MST files.
Note:
- If the group name is invalid or not passed, then the computer will fall into the 'Default' group.
- If the personal key is invalid or not passed, then it will be set to a default value (Personal Key).
- If the value for HIDETRAY is invalid or not passed, then the settings will be fetched from the web and applied on the remote computer.
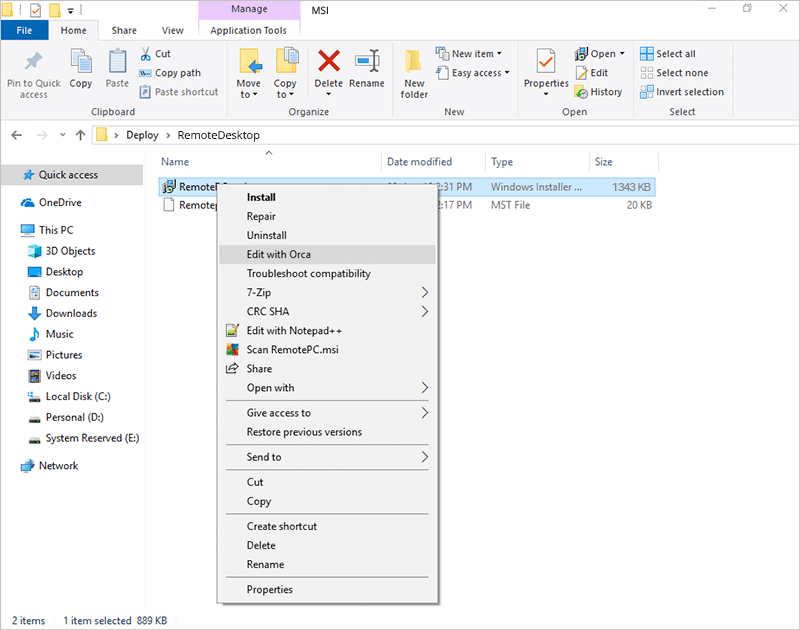
To create a Remote Desktop.mst file,
- Install Orca, the tool used to edit MSI files.
- Download a new RemoteDesktopViewer.msi file.
- Open the MSI file location, right-click 'Remote DesktopViewer.msi', select 'Edit with Orca'.
- In the menu that appears, click 'Transform' and then select 'New Transform'.
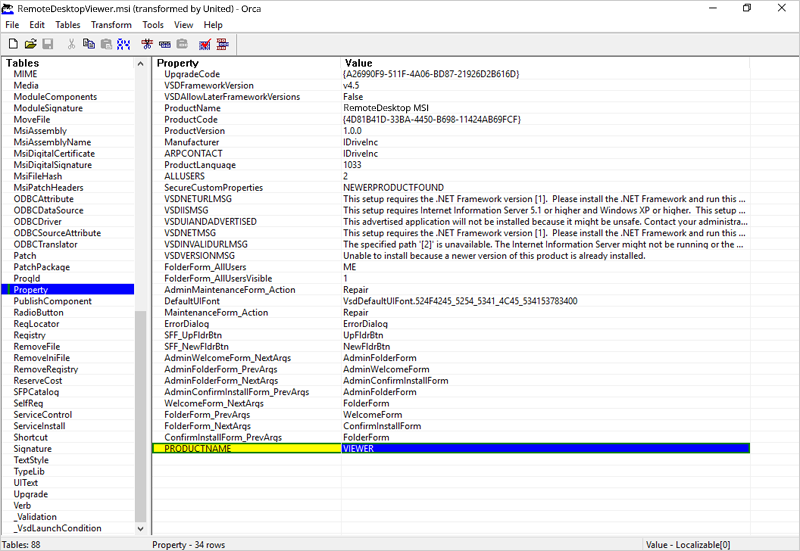
- Navigate to the 'Property Tab' and edit the following:
- In the 'Add Row' tab, add 'Property' as 'PRODUCTNAME' and 'Value' as 'VIEWER', which is a mandatory parameter. In order to configure optional parameters, add additional rows.
Parameters Description PRODUCTNAME Product name must be mentioned as 'viewer' to install the Remote Desktop Viewer application. UNINSTALL Include this parameter along with PRODUCTNAME= viewer to uninstall Remote Desktop viewer using the MSI command UNINSTALL=yes. - Go to 'Transform', select 'Generate Transform' to complete the mst creation.
- Deploy with MSI and MST files.
To enable connection request permissions in Remote Desktop Corporate application,
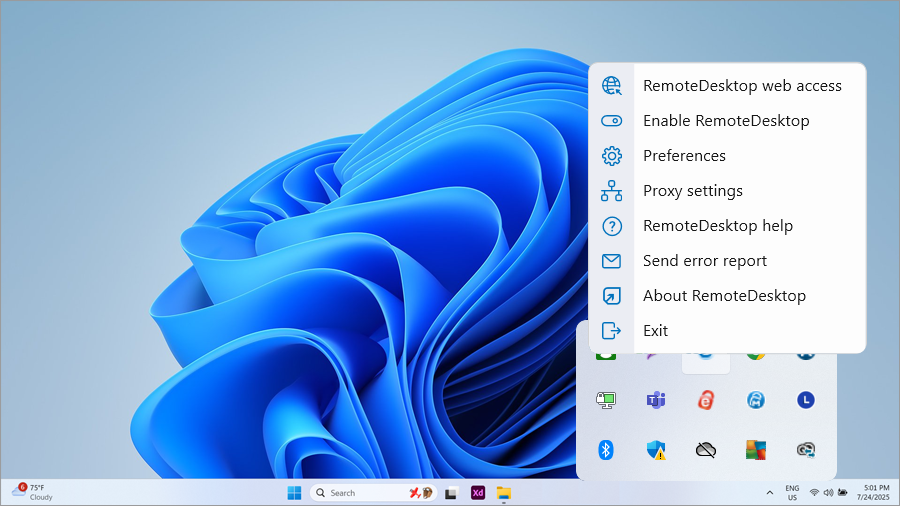
- Right-click on the Remote Desktop Corporate application launcher, and select 'Preferences'.
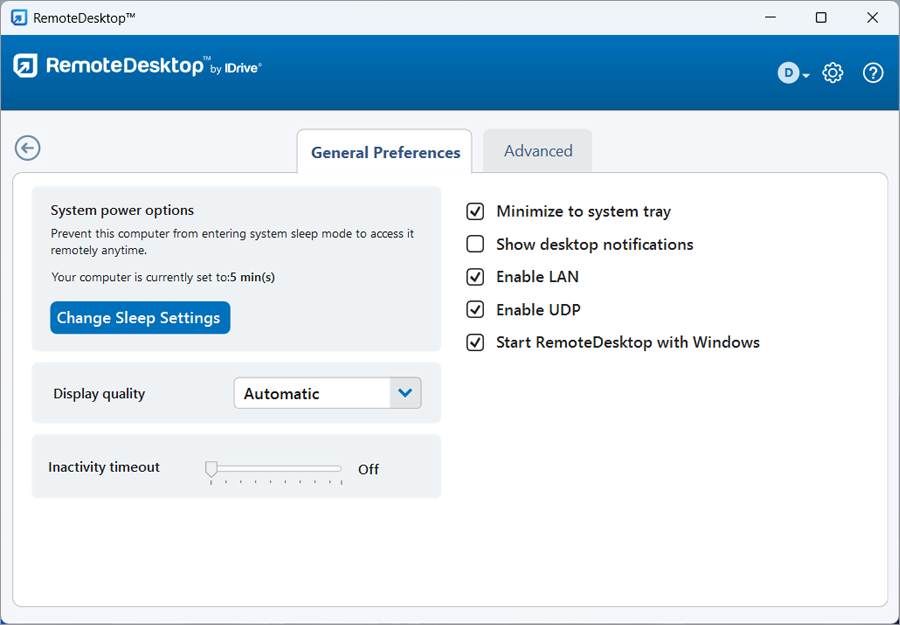
- Under the 'General' tab, select the checkbox to enable 'Connection request permissions' and choose from the following options:
- Decline connection after the request expires
If at login, auto-connect
A popup displays on the remote computer to 'Allow' or 'Deny' the connection request. If none of the options are selected within a time period of 20 seconds, the connection will be automatically denied.
If the computer is locked or not logged into a user, it will connect automatically. - Decline connection after the request expires
If at login, auto-decline
A popup displays on the remote computer to 'Allow' or 'Deny' the connection request. If none of the options are selected within a time period of 20 seconds, the connection will be automatically denied.
If the computer is locked or not logged into a user, it will disconnect immediately. - Auto-connect after the request expires
A popup displays on the remote computer to 'Allow' or 'Deny' the connection request. If none of the options are selected within a time period of 20 seconds, the connection will be automatically established.
- Decline connection after the request expires
If at login, auto-connect
Yes, Remote Desktop supports headless Linux Servers for the Corporate plan users. You can download and install the Remote Desktop-CLI application on any Linux Headless server and deploy it to access it remotely. Use the following command to deploy:
Note: The following remote access features are not supported for headless Linux servers
- Play remote sound
- File transfer
- Whiteboard
- Chat
- Lock remote computer instantly
- Sticky notes
You can download the Remote Desktop-CLI application using the following links:
| Linux Flavor | Download Link |
|---|---|
| Debian | wget downloads/rdp/autoupdate/remote-desktop-cli.deb |
| RPM | wget downloads/rdp/autoupdate/remote-desktop-cli.rpm |
| Suse-RPM | wget downloads/rdp/autoupdate/remote-desktop-cli-suse.rpm |
You can view remote access logs for unattended and attended sessions under 'Logs', and web activity logs of your account under 'Activity Logs'.
- Log in to Remote Desktop via web browser.
- Go to 'Logs' and click 'Unattended Access Logs' for unattended remote session details or 'Attended Access Logs' for attended remote session details.
- Select the date range and click 'Generate'.
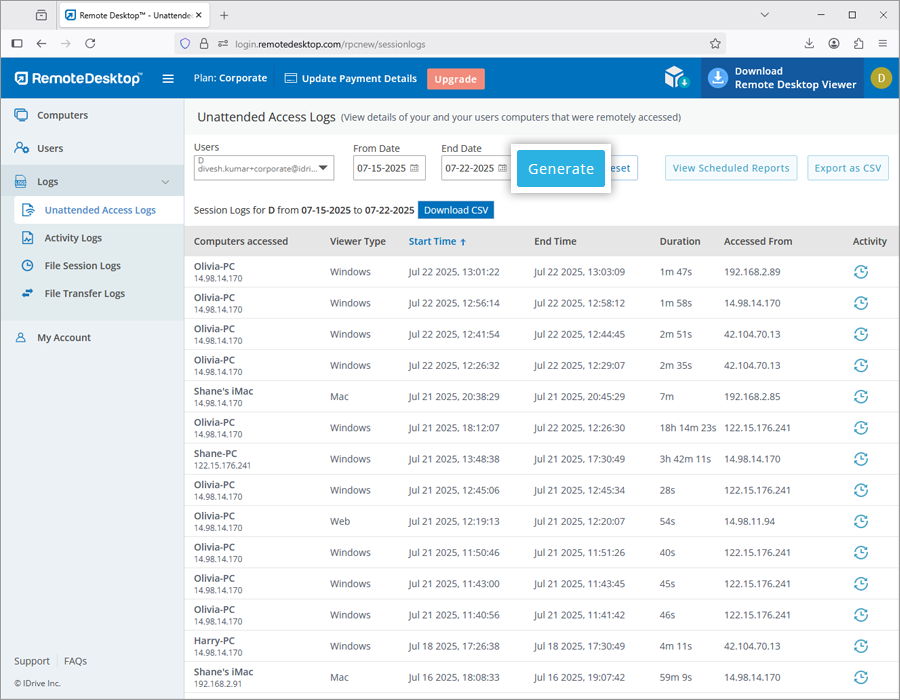
Remote access logs will be displayed with information such as computer accessed, viewer type, start time, end time, and IP address.
To download for the time period between the last 90 days, select 'From Date' and 'End Date' and click 'Download CSV'.
The logs prior to 90 days can be exported as CSV.
To export ,
- Click 'Export as CSV'.
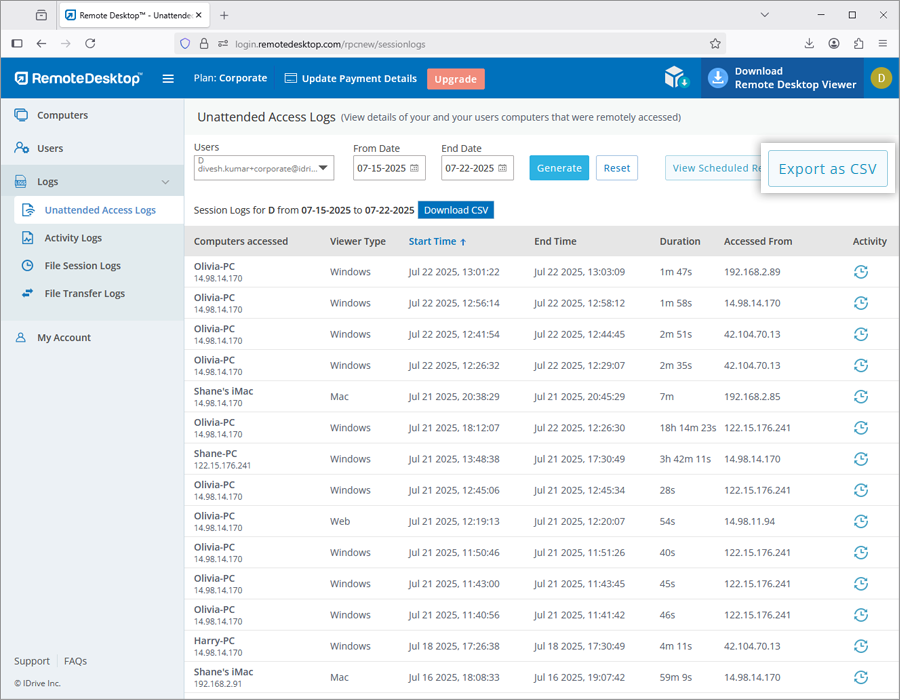
- Select the required username from the drop-down menu.
- Select the month and year and click 'Download'.
To view web activity logs,
- Log in to Remote Desktop via web browser.
- Go to 'Activity Logs'.
- Select the date range and click 'Generate'.
Web activity logs will be displayed with information such as description, date and time of the last activity and IP address.
Note: Admin can view remote access logs and web activity logs of user accounts too by just selecting the user from the 'Username' drop-down list.
Yes, you can control the features your users can access during remote sessions. These restrictions will not apply on the account owner.
To disable a remote access feature,
- Log in to Remote Desktop via web browser.
- Click the username and click 'My Account'.
- Go to 'Settings'.
- Under 'Computer Settings', select any of the required options:
- Disable File Transfer / Drag and Drop / Universal Clipboard - Restrict content copy-paste, file transfer, drag and drop, copy-paste files/folders access for all users.
- Disable Remote reboot - Restrict all users from rebooting the remote system remotely.
- Enable connection with Windows / Mac credentials / Linux credentials - Allow all users to connect to remote computers with their Windows / Mac / Linux credentials.
- Disable video chat (pre-session) - Disable video chat before establishing remote connection with the remote computer.
- Disable session recording - Disable the option to record remote sessions.
- Disable simultaneous remote session - Prevent multiple users to remote into one computer simultaneously.
- Disable remote print - Disable remote printing
- Disable remote sound - Prevent users from playing sound from remote devices
- Disable in-session indicator - Prevent the in-session indicator from being displayed in the computer list
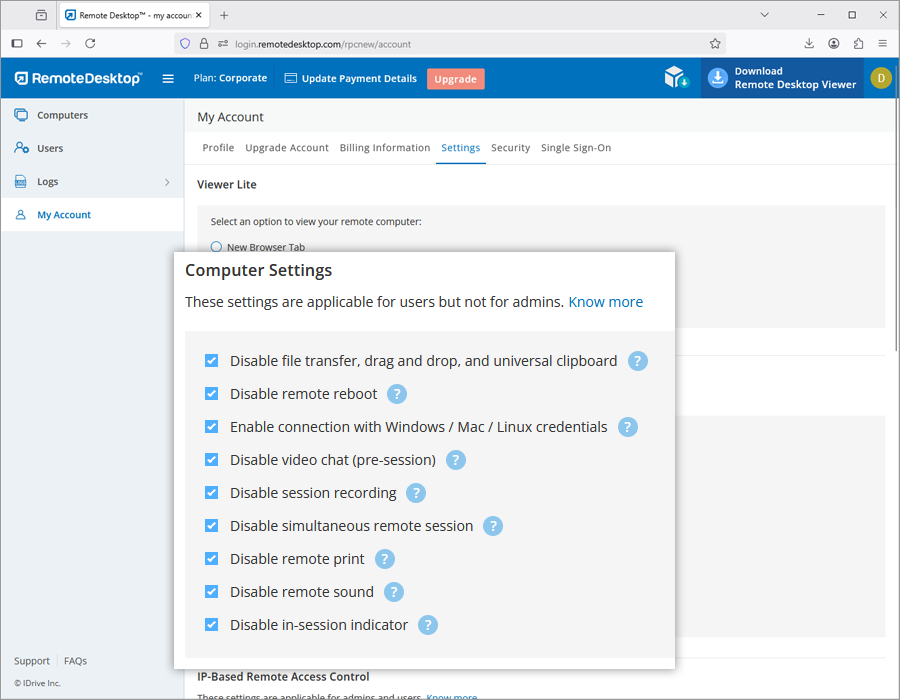
Note: These restrictions will not apply on the account owner.
To access your remote computer using Windows/Mac/Linux credential,
- Log in to Remote Desktop via the web browser.
- Click the username and click 'My Account'.
- Go to the 'Settings' tab. Select 'Enable connection with Windows / Mac / Linux credential'.

While connecting to the remote computer you will be asked to enter your Windows/Mac/Linux credential for login.
Note:
- Make sure that the Remote Desktop application is installed in the remote machine before enabling this option.
- If you disable this option, you can access your computer by entering the Personal Key (if configured).
Yes, you can disable file transfer, drag and drop, copy-paste files/folders access for all the users linked to your account.
To disable file transfer,
- Log in to Remote Desktop via web browser.
- Click the username and click 'My Account'.
- Go to 'Settings' -> 'Computer Settings'.
- Select the 'Disable File Transfer / Drag and Drop' checkbox.
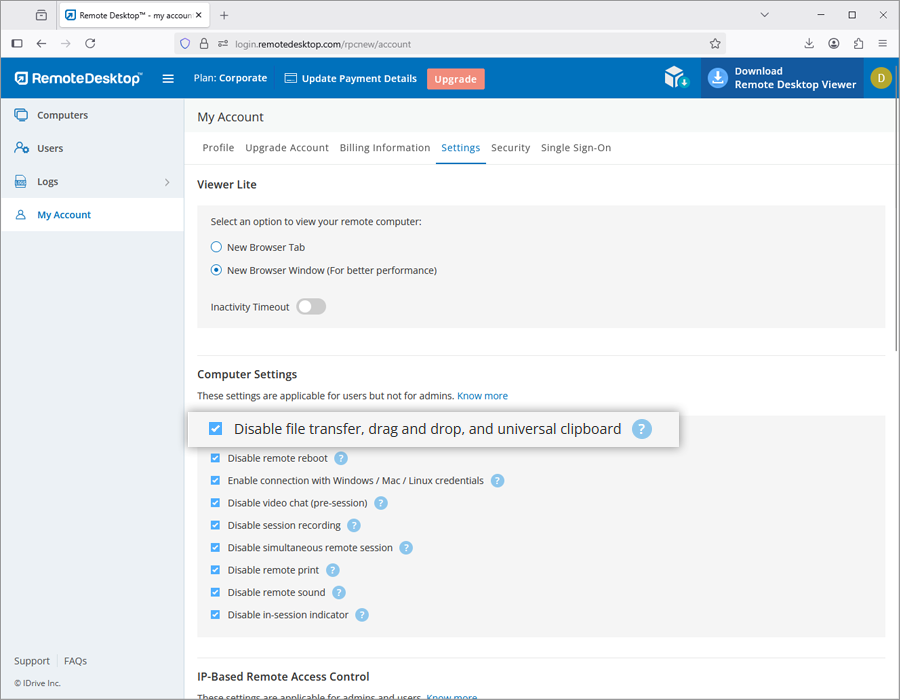
File transfer will be disabled for all your users.
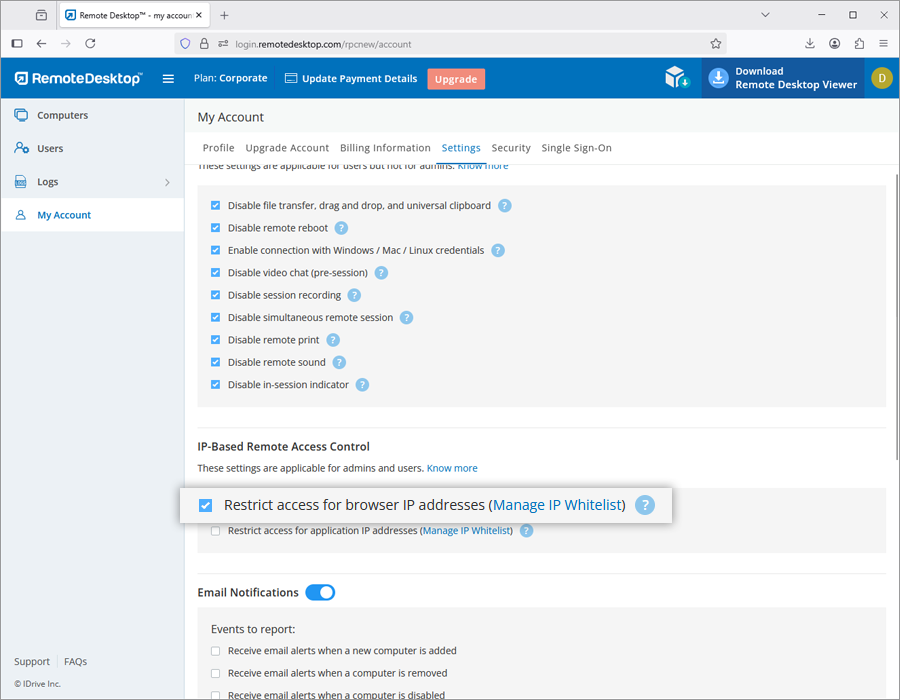
Yes, admin of Corporate and Premium plans can restrict IPv4 addresses while using the remote desktop application or web browser for remote access.
To allow remote access from specific networks,
- Login to the Remote Desktop via a web browser.
- Click the username and click 'My Account'.
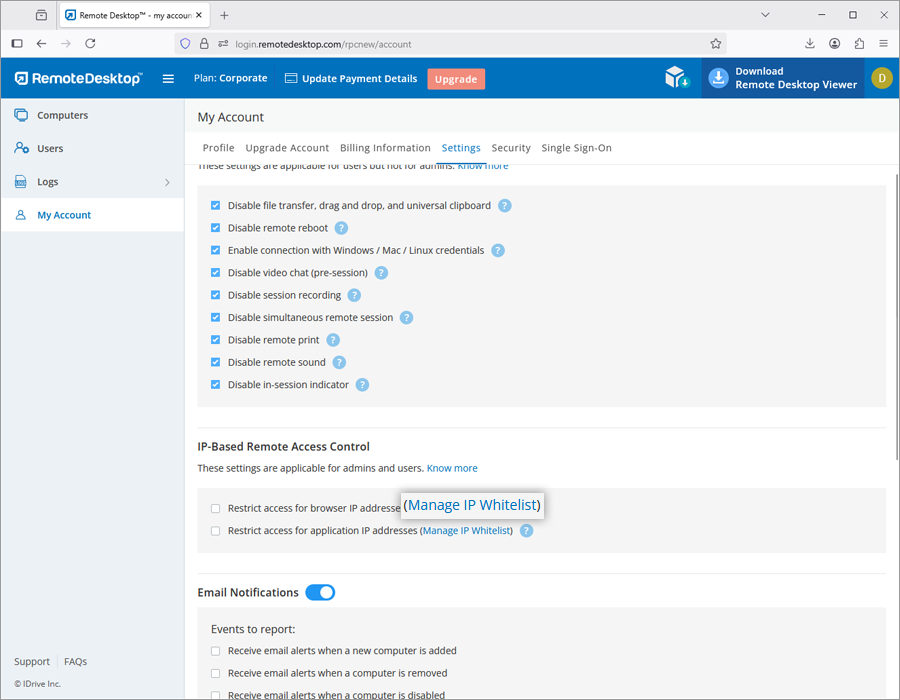
- Go to 'Settings' > 'IP-Based Remote Access Control'. You can select the options to whitelist IPv4 addresses for remote access.
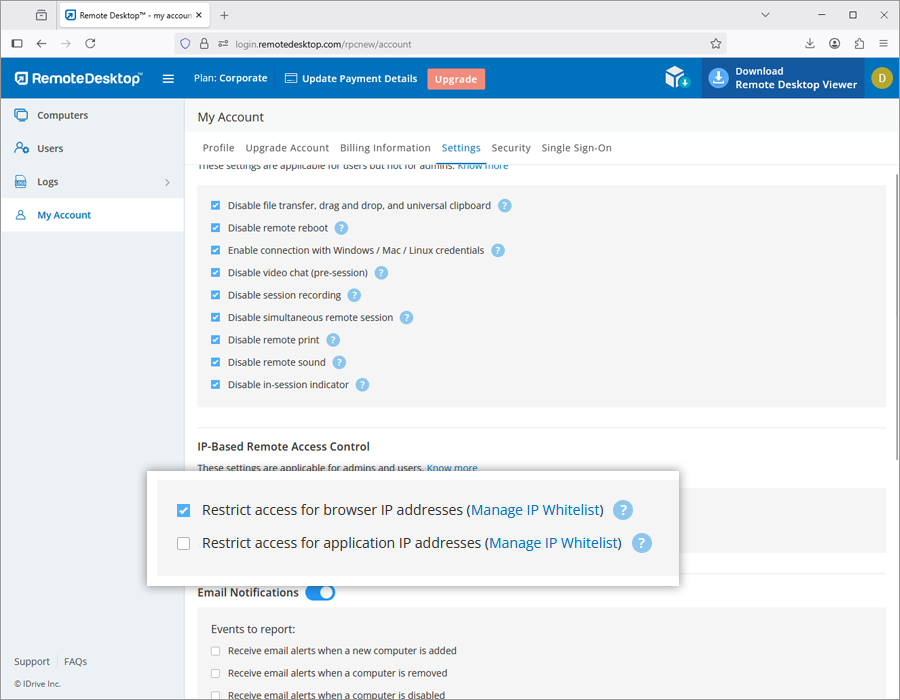
To whitelist public IPv4 addresses for remote desktop application or web browser,
- Select 'Manage IP Whitelist' corresponding to 'Restrict access for browser IP addresses' or 'Restrict access for application IP addresses', respectively.
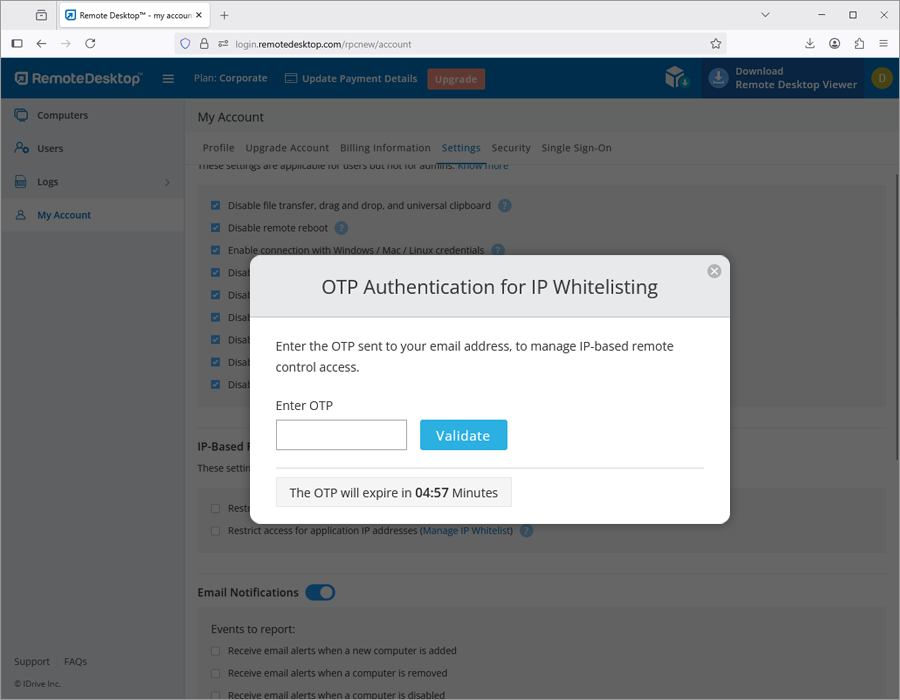
- An OTP will be sent to your registered email address, enter the OTP to validate.
- Enter multiple public IPv4 addresses separated by comma, or enter a subnet to whitelist.
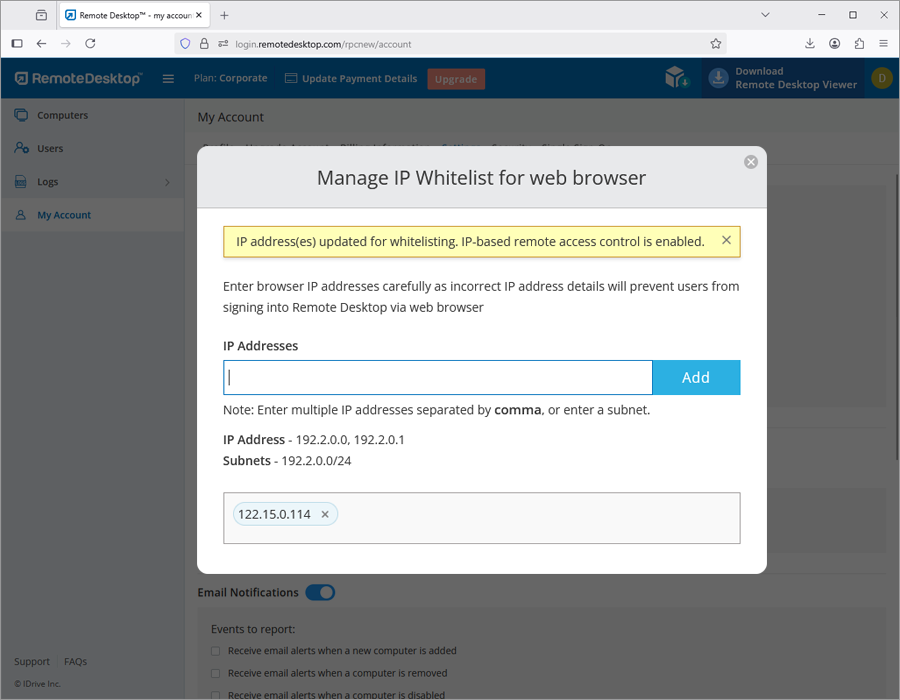
- Click 'Add'.
- Once IPv4 addresses are whitelisted in the Settings tab, select 'Restrict access for browser IP addresses' to apply the changes.
To wake up an offline remote computer after enabling WOL,
- Log in to Remote Desktop via web browser.
- From the 'Computers' tab, click
 displayed next to the offline computer to wake up that computer.
- Select 'Wake-On-LAN'.
Note:
- 'Drag and Drop' feature is not available for connections via Linux machines.
- Some options like 'Session Recording' and 'Send key combinations' will not be available while using Remote Desktop™ Viewer Lite.
Yes, you can install the Remote Desktop application on multiple PCs, Macs, and Linux machines using the 'Deploy Package' function.
You can either install the Remote Desktop Host application on the computers that you want to access or deploy the host application on computers at multiple locations by sharing an installation link with the users.
You can also install the Remote Desktop Viewer application on your computers and use them only to access remote computers.
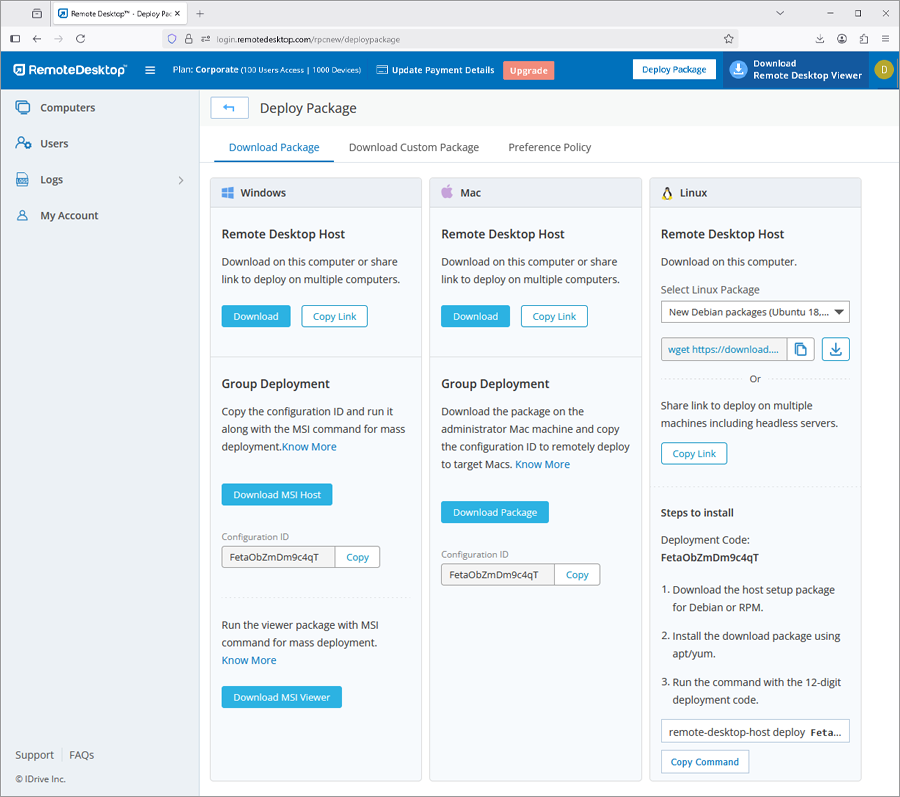
To enable remote access or deploy,
- Log in to Remote Desktop via web browser.
- Click 'Deploy Package'.
- For Windows and Mac host, click 'For Windows Package' or 'For Mac Package' respectively, and perform any of the following:
- Click 'Download Remote Desktop Host' to install the Remote Desktop application on the computer you are logged in and enable remote access.
- Share the provided link with the users to deploy the Remote Desktop application on other computers.
- Click the 'Download MSI' button, copy the configuration ID and run it along with the MSI command for mass deployment in Windows. Know more.
Or
Click the 'Download Package' button, and install the package via Apple Remote Desktop to perform mass deployment in Mac. Learn more.
- For Linux, click 'For Linux Package' and perform the following:
- Download the Debian or RPM host setup package depending on the distribution of your Linux computer.
- Install the download packages by running these commands:
- For Debian:
sudo apt update
apt install ./remotedesktop.deb - For RPM:
sudo yum update
yum install ./remotedesktop.rpm
- For SUSE:
sudo zypper update
sudo zypper install ./remotedesktop-suse.rpm
Note: Use 'dnf' if 'yum' is not available
- For Debian:
- Deploy the package by running this command with the 12-digit deployment code:
remotedesktop-host deploy <Deployment Id>
To install the Remote Desktop Viewer application,
- Log in to Remote Desktop via web browser.
- Click 'Download Remote Desktop Viewer'.
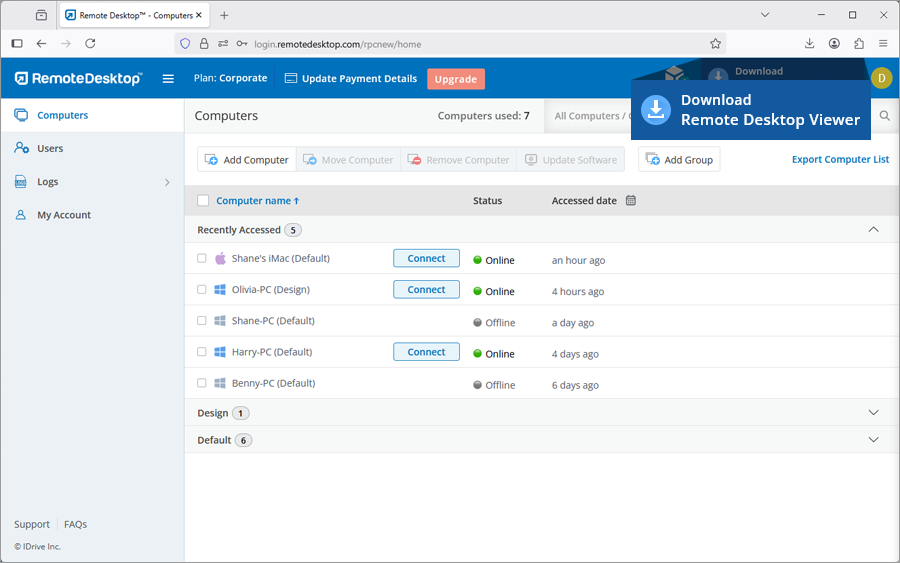
This will download the Remote Desktop viewer application on your PC or Mac. For Linux machines, download the viewer setup for Debian or RPM distributions and follow the instructions.
Remote Desktop is compatible with Windows devices running on Intel, AMD, and ARM processors.
To learn which versions of Windows are supported, click here.
Yes, as an Admin of Premium or Corporate accounts, you can enable the option to remotely connect to your computer with your Windows / Mac credentials. On enabling, the feature will apply to all the users linked to your account.
To enable,
- Log in to Remote Desktop via web browser.
- Click the username and click 'My Account'.
- Go to 'Settings'.
- Under 'Computer Settings', click the checkbox 'Enable connection with Windows / Mac credentials'.

Once enabled, you can establish connection with your remote computer via the web or desktop application,
- Click the 'Connect' button.
- If the Personal Key is enabled, an additional field 'Advanced' appears. Click the same, and enter your Windows / Mac credentials.
- If the Personal Key is not enabled, enter your Windows / Mac credentials directly on the screen that appears.
Note: Make sure your remote computer is password protected, as it is mandatory to enter your Windows / Mac password to proceed.
- Click 'Connect'.
Note: Premium and Corporate plan users can enable this option from the Preferences section of the remote computer.
I signed up for a Remote Desktop Corporate account but am unable to configure my computers. What should I do?
As an Admin of Corporate account, you can configure your computer by downloading the setup from the 'Deploy Package' section in the web interface. You can also share the URL in this section with a user linked to your account; which the user can use to download the setup.
However, the setup can only be used once. So every time you wish to add a new computer, you need to download the setup again from the 'Deploy Package' section.
Remote Desktop On-premise is a remote access and remote support solution hosted on the premise of an organization or within their datacenter. Being located close to the user, it provides better and faster remote access capabilities with highest security compliance.